Back to ELD Driver App
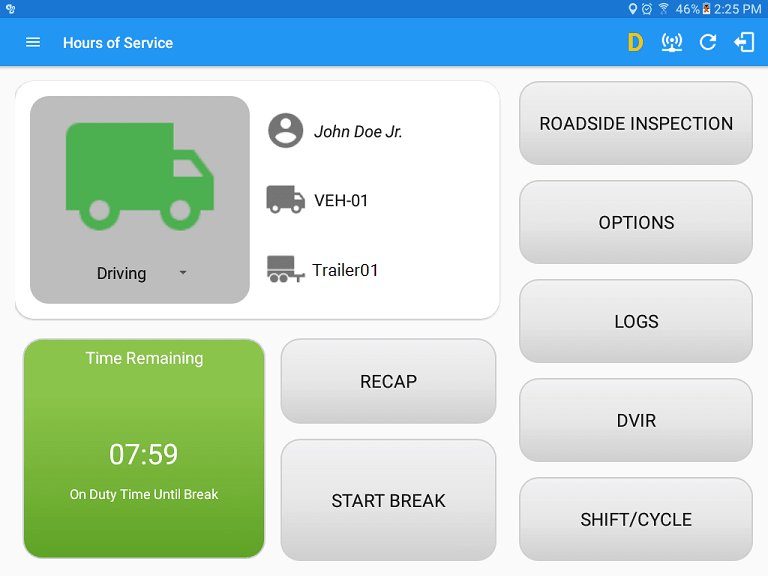
Main Dashboard
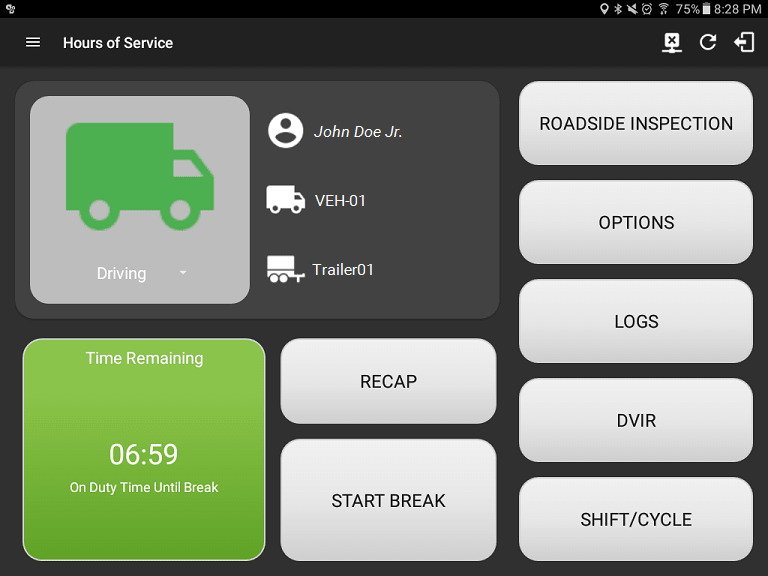
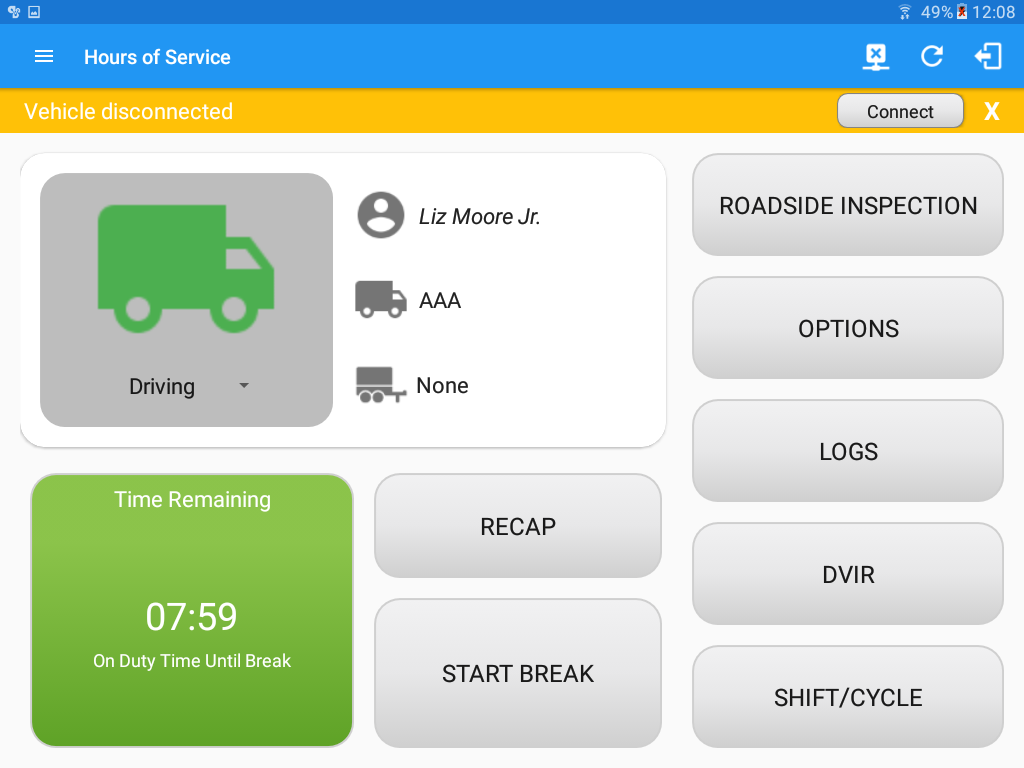
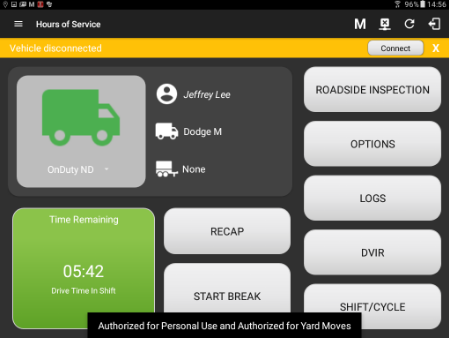
The Hours of Service Dashboard is where you log your duty status events and which, in turn, determines your compliance with Hours of Service regulations. This screen also serves as your gateway to the rest of the HOS app’s features.
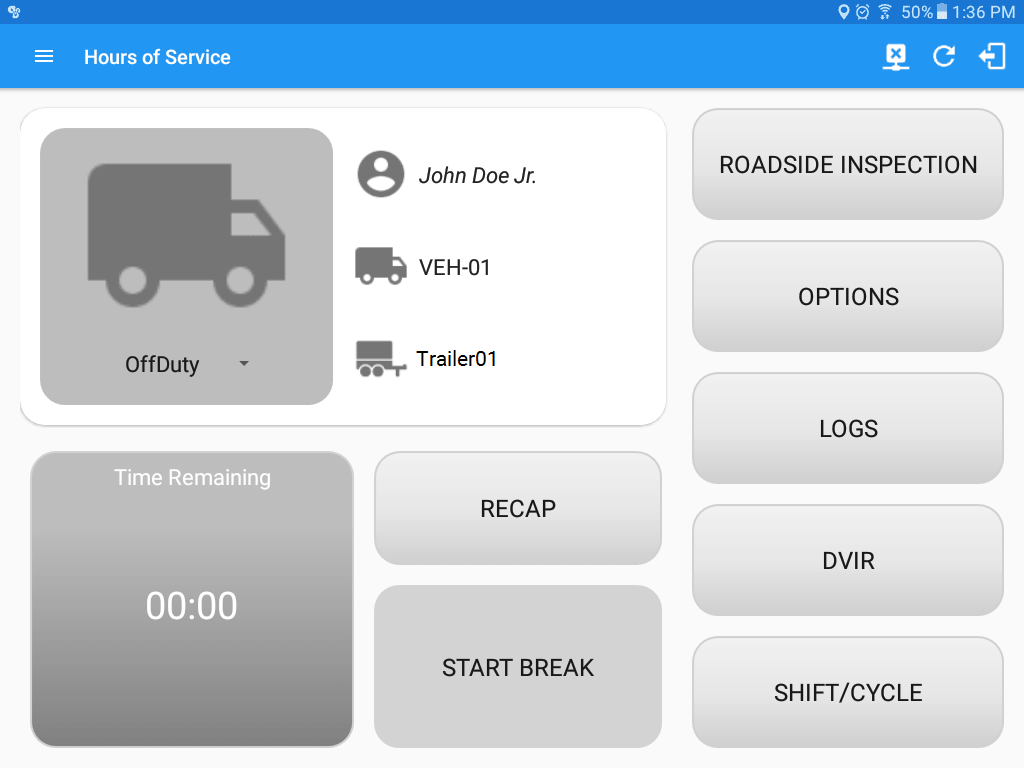
The dashboard also provides the following essential information about the HOS app’s user:
 |
Driver Name: Displays the name of the driver |
| Vehicle Name: Displays the driver’s current Vehicle | |
| Trailer Name: Displays the driver’s current Trailer |
The HOS application has a night mode enabled by default which automatically changes the color scheme of the user interface of the app. This mode is enabled based on the sunset time calculated from the device’s location. If location is not available, the local time of the device is used.
Note: The layout shown above is the default arrangement of buttons for the Main Dashboard. The button layout for the Main Dashboard and the Options screen can be configured and rearranged in the portal’s Button Editor.
1. Using Hours of Service Action Bar
The Hours of Service Action Bar is the starting point for navigating to the different pages in the HOS app and is always present in the app’s topmost portion.
![]()
It features the following main navigational controls of the HOS app:
 Main Navigation Hamburger Icon: Tap to open the main navigation menu of the HOS app.
 Pending Edit Request Button: Icon only displays when there are request to edit events from Motor Carrier Personnel and Co-Driver(s). Tap the icon to display the list of pending edit request(s) which driver(s) will take action to “accept” or “reject” a specific request.
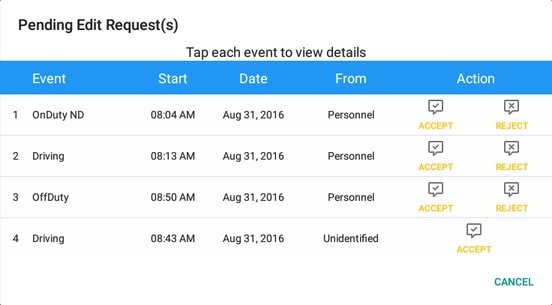
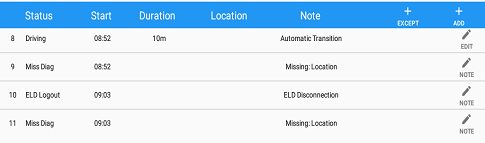
Note: On instances where the vehicle has been moving for more then 3 minutes while there is no driver logged in, the ELD automatically records this activity as “Unidentified Driving Events” under the driver: “Unidentified Driver”. These events can be reassigned to actual drivers upon logging in to the app, under Pending Request(s).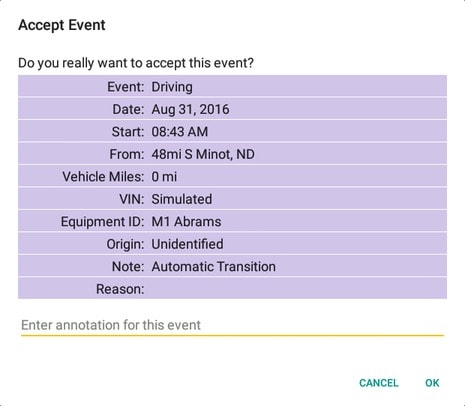
If the driver accepts the edit request(s) then the new status will be displayed on the events history list and will replace the old status.
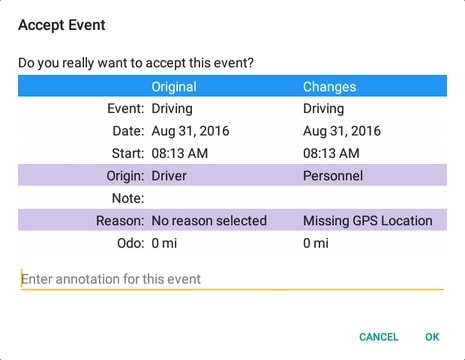
If the driver rejects the edit request(s) then it will not replace the original status however the status will still be recorded in the events history list with a note Inactive Change Rejected (ICJ).
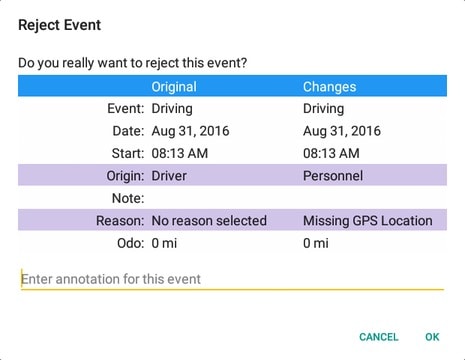
The Reject and Accept Event dialog shows the comparison of the Original status vs the changes (requested edits) made by the Motor Carrier Personnel. Once the edit requests are accepted, it will require the driver to fill in the annotation field (Required, maximum of 60 characters) to successfully save the changes.On the Main Dashboard, Tap on Logs button then edit logs. The driver can check in the events history list for the accepted and rejected event statuses.
Notes:
- Odometer field is displayed for edit request(s) made by the Personnel
- Vehicle Miles field is displayed for edit request(s) made by the Unidentified Driver
- The Unidentified Driving Event pending edit request dialog has additional details like: From, To & Equipment ID compared to that of the Personnel’s pending edit request dialog
 Refresh Button: Tap to manually refresh the data in the HOS app page.
 Logout Button: Tap to log out of the HOS app.
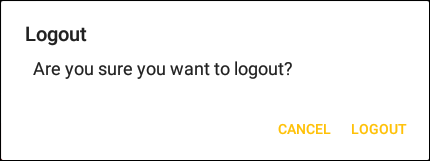
Logging out of the HOS app when the status is “Driving/On Duty” will pop up a different message dialog and will also set the driver status to “Off Duty”.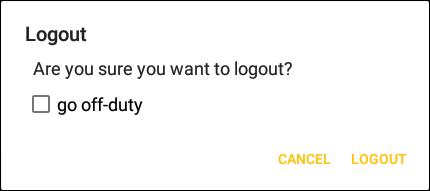
Note: Once the “go off-duty” option is checked, all the valid driver that logged into the HOS app will be logged out and the HOS app will be close completely (with no Snaptraq service or VBUS service running in the background).If the Driver is an Exempt Driver or a driver that operates under the short-haul exemption (395.1 (e)), upon logging in or out, a dialog will display confirming whether the driver chooses to continue as an exempt driver. By selecting the OK button, the “No Logs for Non-CDL-Driver Short-Haul Drivers operating within 150 air-miles” exception will be enabled.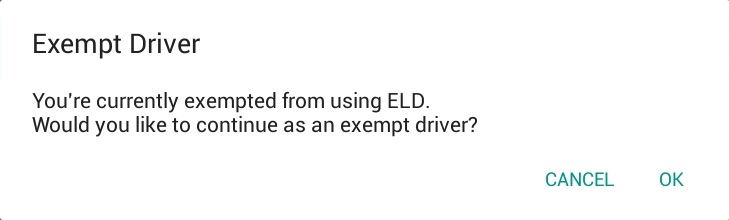
 Malfunction Button: Tap to display the Malfunction Event(s) dialog .
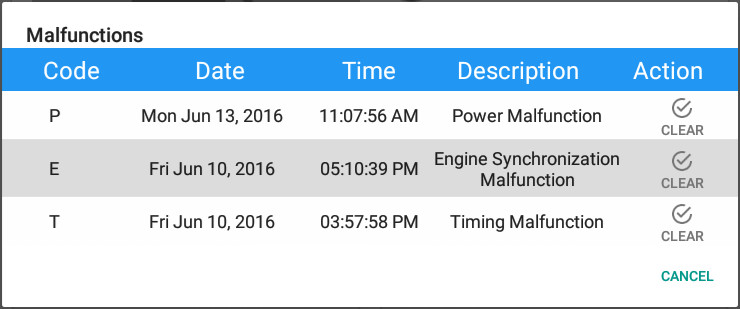
Malfunction and Data Diagnostic icon is displayed always in the toolbar. Malfunction Indicators acquired by the driver will be displayed in the application’s Header which is always visible across all screens. There will also be a notification in the Android toolbar indicating a malfunction.
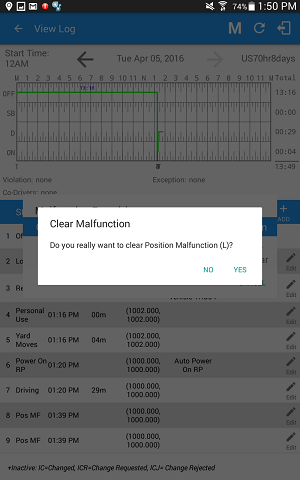
To clear the malfunction, tap on the Clear button. The Clear Malfunction dialog will then be displayed.
At each instance when an ELD malfunction or data diagnostic event is detected or cleared by the ELD, the ELD records the event.
Note: A Power Malfunction & Diagnostic will be triggered once the device is not connected to a power source and that the battery level is down to 10%. VBUS Connection Icon: Indicates if the device is connected to a VBUS device. and turns to
  when disconnected. Hence, connection interruptions may occur which will turn into flashing icon
  while in a reconnecting state.
The VBUS Connection indicator will be displayed in the application’s Header which is always visible across all screens.
VBUS Connection bar
The Connect button has the same capabilities as the connection icon

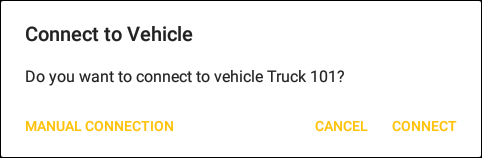
Connection Process
- Tap the Connect button to display the Vehicle Data Settings and enable VBUS data.
- Manual Connection
- Tap on the Manual Connection button
- Note: When drivers who do not have asset admin permission attempts to perform a manual connection, an error dialog will appear
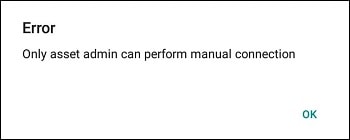
- Note: When drivers who do not have asset admin permission attempts to perform a manual connection, an error dialog will appear
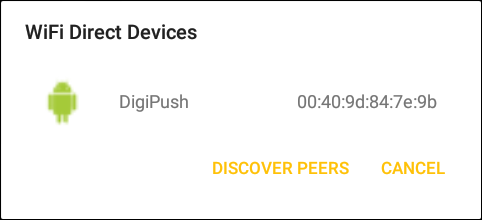
- List of VBUS devices that would appear in the app will be configured in portal.
- Select a supported VBUS Device and Tap ‘Next’.
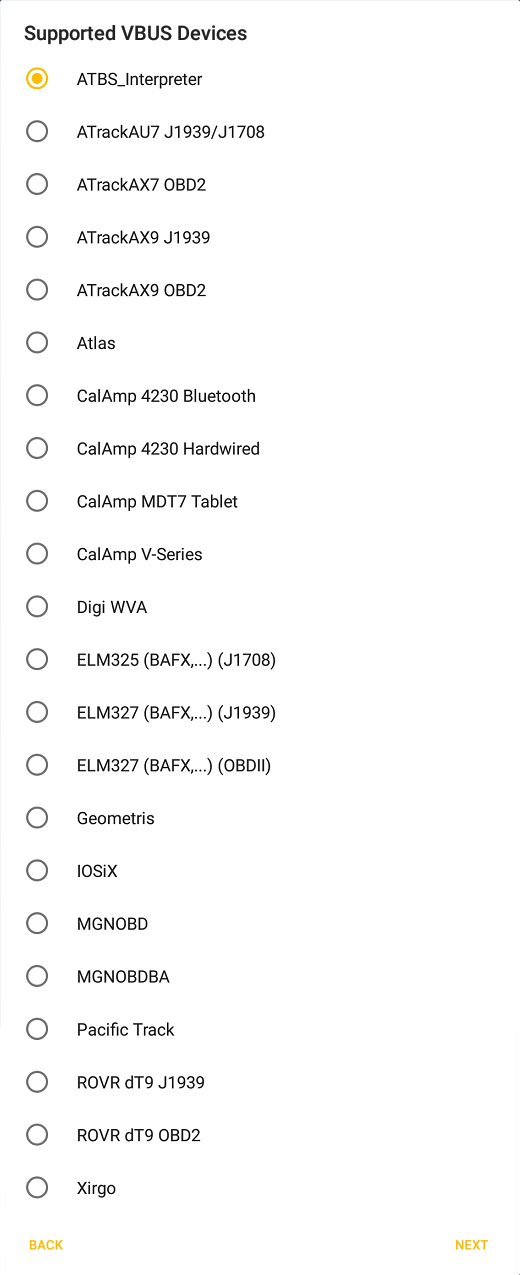
- ATBS_Interpreter, ATrackAU7 J1939/J1708, ATrackAX7 OBD2, ATrackAX9 J1939, ATrackAx9 OBD2, Atlas, CalAmp 4230 Bluetooth, CalAmp 4230 Hardwired, CalAmp MDT7 Tablet , CalAmp V-Series, ELM327 (BAFX,…) (J1708), ELM327 (BAFX,…) (J1939), ELM327 (BAFX,…) (OBDII), Geometris, IOSiX, MGNOBD, MGNOBDBA, Pacific Track, ROVR dT9 J1939, ROVR dT9 OBD2 and Xirgo XT6360 devices connects via bluetooth.
- Will display the Bluetooth Permission Request dialog
- After accepting the request, the list of Bluetooth devices will display depending on the selected device.
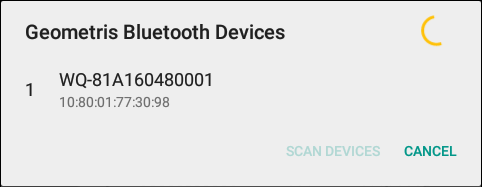
- Tap on the device name to display the Connect dialog and establish a connection to the device.
- DIGI WVA device connects via WiFi.
- The ‘Configure VBUS device’ dialog will be displayed.
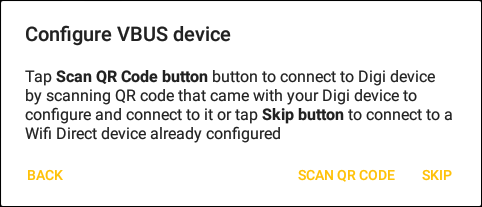
- Configure the device if it will be used for the first time.
- Tap on the device name to display the Connect dialog and establish a connection to the device.
- Enter the PIN for DIGI WVA device configured for PIN Pairing mode or Hold the Digi WVA button down for 3 seconds for Digi WVA device configured for Push Button pairing.
- The ‘Configure VBUS device’ dialog will be displayed.
- After tapping the device name, the VBUS Progress dialog will be displayed along with a progress spinner over the connection icon to have a visible indication of the connection progress. The driver can also enabled to cancel an in-progress connection via the OK and Stop Connection button found in the VBUS Progress dialog.
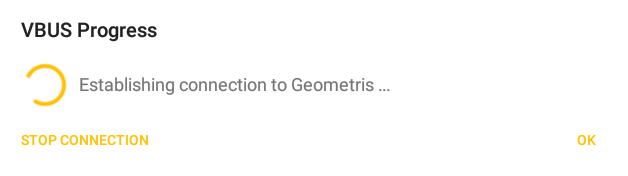
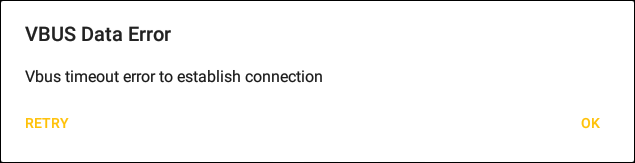
Notes:- VBUS data error dialog will appear when no VBUS data received within 60 seconds.
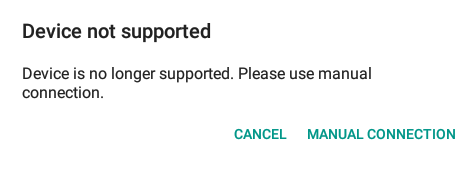
- If the app attempts to connect to an unsupported device. the app then displays a dialog which warns the user that the equipment has an invalid VBUS device type set and that the default device type is being used. The ‘Device Not Supported’ dialog will be displayed stating: “Device is no longer supported. Please use manual connection.” along with a Cancel and Manual Connection buttons.
- VBUS data error dialog will appear when no VBUS data received within 60 seconds.
- Tap on the Manual Connection button
- Auto Connection
- Tap on the Connect button
- The VBUS Progress dialog will then display
- Upon establishing a connection to the VBUS device, You should hear a tone letting you know that device is now connected and that an event ‘ELD Login’ will be recorded in the events list.
- Manual Connection
- Disconnect to the device by tapping on the VBUS icon
- Tap on the Connect button
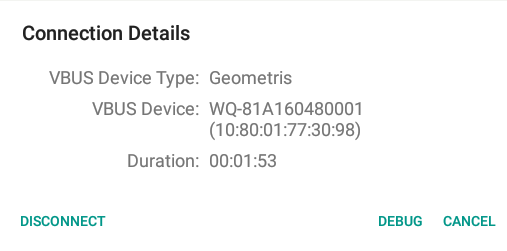
- The Connection Details dialog will then display
- Tap on the Disconnect button
- The Disconnect dialog will then display
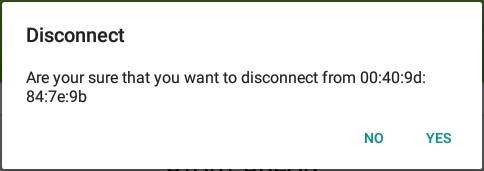
- Tap on the Yes button to confirm disconnection from the app to the VBUS device
- Upon successfully disconnecting to the VBUS device, an event ‘ELD Logout’ will be recorded in the events list. However, if the connection was drop due to interruptions (low signal & etc.) which will disconnect the app to the VBUS device, it will not create an ‘ELD Logout’ event.
- Accessing the VBUS Service Debug screen
- Tap on the Debug button
- The VBUS Service Debug screen will then display. It shows the live vbus data which helps the driver monitor the device.
Notes:
- If the VBUS data is disabled then the following events should not take place:
- Detection of any data diagnostic or malfunction events
- The ELD Compliance Test should only run when VBUS is connected
- Also, Upon connection/disconnection to the VBUS device, it logs the connection/disconnection events in the Exceptions.txt file (found on the device storage under the app name’s folder)
- Tap the Connect button to display the Vehicle Data Settings and enable VBUS data.
 Data Diagnostics Button: Tap to display the Data Diagnostics Event(s) dialog .
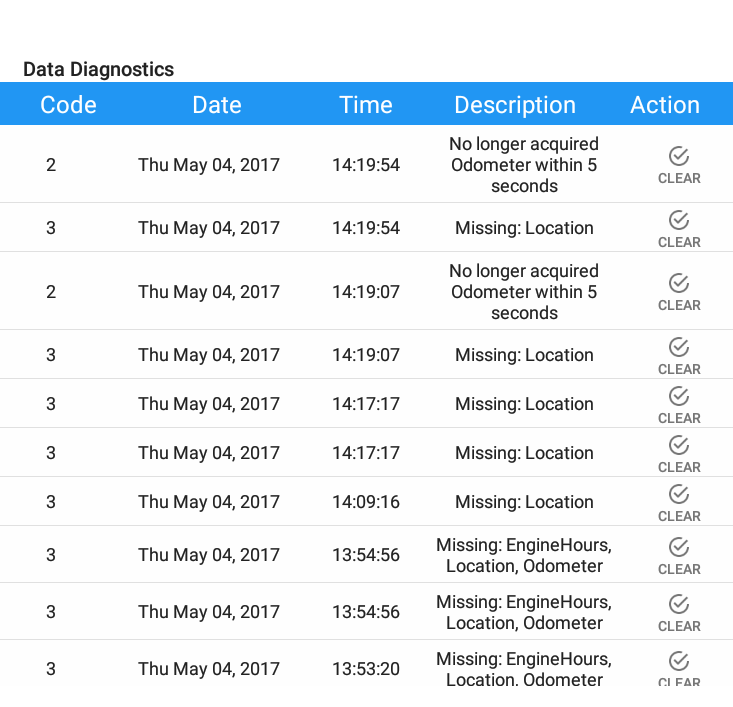
Data Diagnostics Events acquired by the driver will be displayed in the application’s Header which is always visible across all screens. There will also be a notification in the Android toolbar indicating a data diagnostic event.
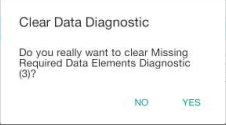
To clear the Data Diagnostics Event, tap on the Clear button. The Clear Data Diagnostics dialog will then be displayed.
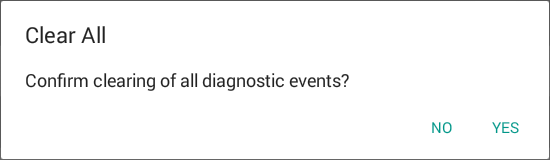
 To clear all the Data Diagnostics Events on the dialog, tap on the Clear All button.
  The Clear All Data Diagnostics dialog will then be displayed
At each instance when an ELD malfunction or data diagnostic event is detected or cleared by the ELD, the ELD records the event.Note:- ELD Data Diagnostic status affects only the authenticated user, therefore, the ELD only indicate the active data diagnostics event status applicable to the active driver. Data Diagnostic Event dialog will no longer pop up whenever it occurs hence, the Data Diagnostic “D” icon will be in a flashing amber color when new data diagnostic events occurred.
The “D” icon will only turn back to white once the dialog for the Data Diagnostic List is closed and will flash in amber color again once there are new active data diagnostic events. - Tap on the “D” icon on the application header to display the Data Diagnostic dialog. On the diagnostic pop up dialog for Missing Required Data Elements it states the exact missing data elements instead of just generic missing data diagnostic error.
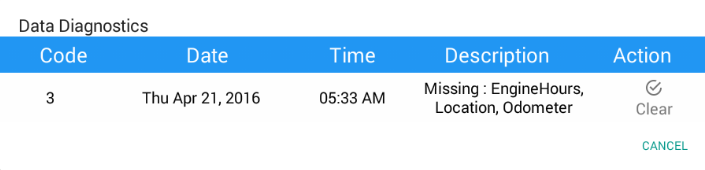
- ELD Data Diagnostic status affects only the authenticated user, therefore, the ELD only indicate the active data diagnostics event status applicable to the active driver. Data Diagnostic Event dialog will no longer pop up whenever it occurs hence, the Data Diagnostic “D” icon will be in a flashing amber color when new data diagnostic events occurred.
2. Customizing the Hours of Service App Preferences
The HOS apps’ settings and preferences can be customized in the Hours of Service App Preferences screen. The following are the steps to navigate to this part of the HOS app:
- Tap the Main Navigation Hamburger Icon or slide to the right to show the main navigation menu.
- Select
 Settings in the HOS app’s main navigation menu and proceed to the
  Hours of Service Preferences screen.
Note: The HOS app preferences/settings are automatically saved.
For further information, please proceed to the documentation of the Hours of Service App Preferences/Settings Menu.
2.1. Quick Guide for Setting the Vehicle Name and Trailer Name
The Vehicle Name and Trailer Name can be customized in the Switch Equipment tab.
Using the Hours of Service Preferences Module At Any Time
- Update the Vehicle Name and Trailer Name: Slide to the right or tap the Main Navigation Hamburger icon to show the main navigation menu.
- Tap on
 Switch Equipment option in the HOS app’s navigation menu, after which a dialog will then be displayed:
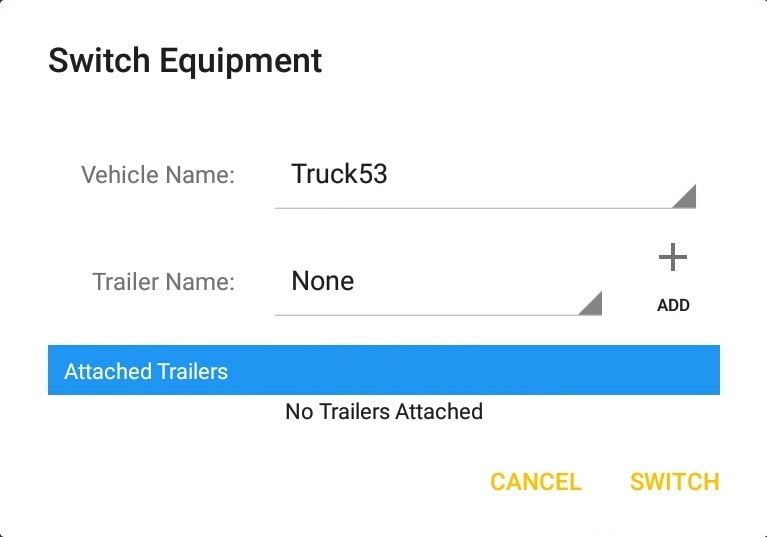
- Tap on the drop-down list of Vehicle Name to select a new Vehicle.
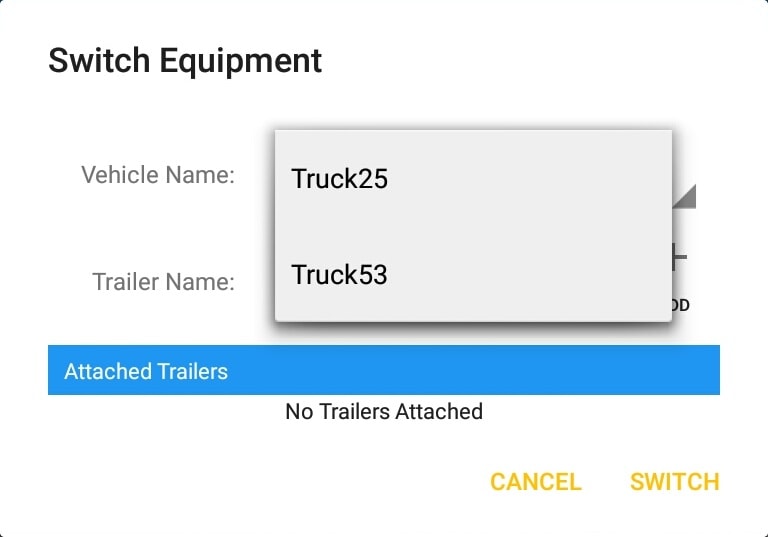
- Tap on the drop-down list of Trailer Name to select a new Trailer.
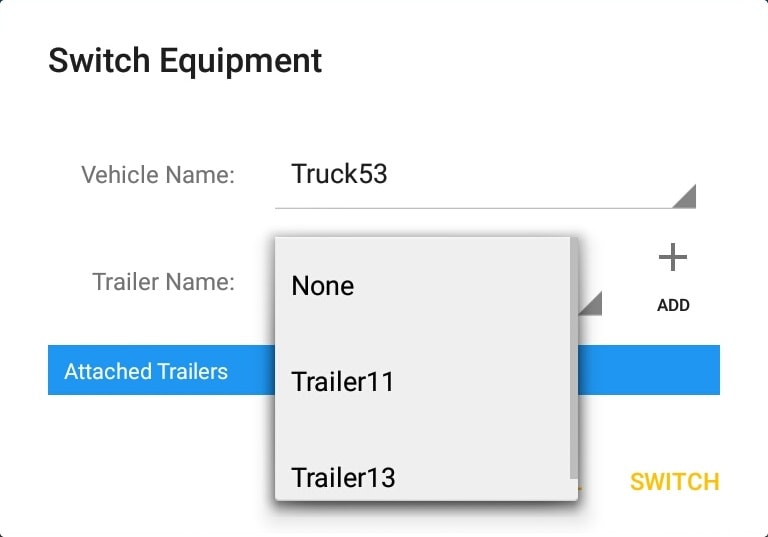
- Tap on the Add button to add the selected trailer to the list of Attached Trailers. Tap on the X button on the right side of the Trailer to remove it from the list.
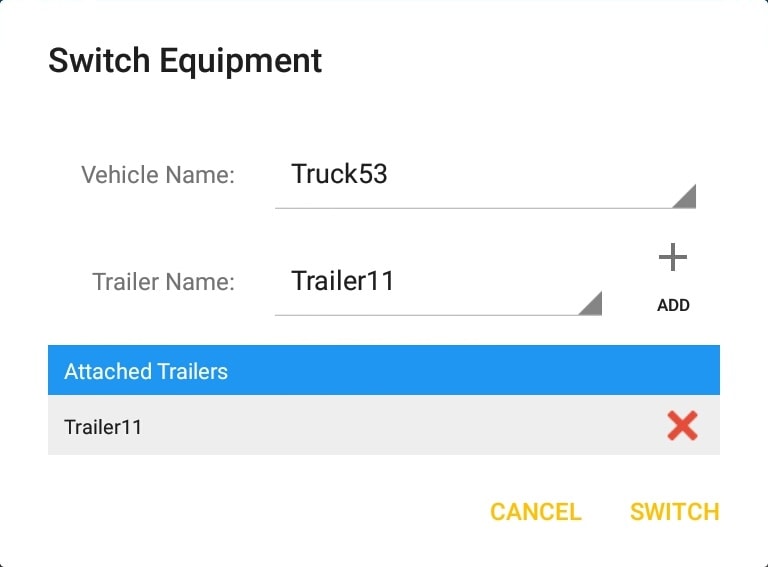
By tapping the Switch button, Vehicle Name and Trailer Name will then be successfully changed.
3. Changing the Driver’s Duty Status
To change the duty status of the driver, do the following steps:
- Tap the Change Duty Status drop-down list.
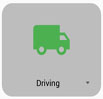
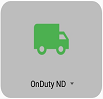
- Select the appropriate driver duty status from the said drop-down list. The available duty status options are:
- Off Duty
- Sleeper (Berth)

- Driving
- On Duty ND (Not Driving)
- Waiting at Site

- Off Duty
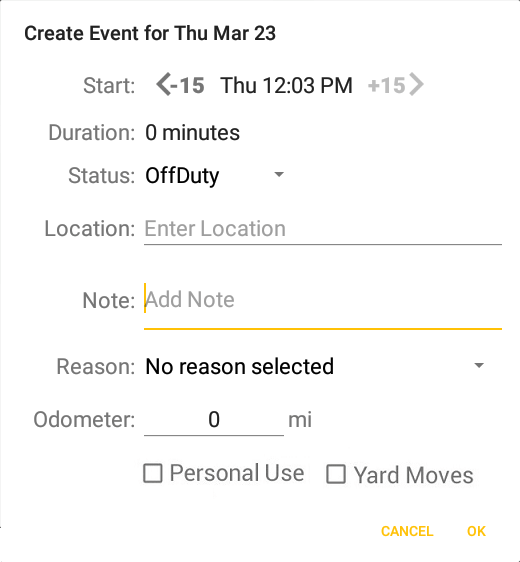
- Selecting a status will show the Create Event pop up dialog. The Start Time is disabled by default to disallow the drivers to edit their Start and End time.
- You can also change the duty status from this drop-down list.
- All driving status will enable the following:
- Personal Conveyance – If this is enabled, the status will be set to Off Duty automatically and will disable the Yard Moves checkbox. Selection of this option will be recorded within the events history list.
- Yard Moves – If this is enabled, the status will be set to On Duty automatically and will disable the Personal Conveyance checkbox. Selection of this option will be recorded within the events history list.
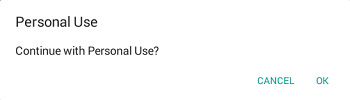
Note: The Personal Conveyance and Yard Moves options only displays when the User Preferences and carrier value is set to true. Upon logging in to the app with the Personal Use and Yard Moves options enabled in the user preferences and account properties, a snackbar will show stating: “Authorized for Personal Use and Authorized for Yard Moves”
Once Personal Use is enabled and if the driver’s indication is not confirmed by the driver and the vehicle is in motion (driving status), the ELD prompts a dialog if the driver wants to continue using authorized personal use. If the driver does not confirm the prompt and status is default to none.
- When changing the driving status to “Driving” , a snackbar reminder will launch along with the INSPECT link which leads to the DVIR screen, reminding the driver to perform a Pre-trip DVIR if he forgot to do so.
- When the HOS app is able to get a GPS position fix, the Location field will be automatically filled in with the current location of the user. You can also manually fill in the Location field if you cannot get a GPS fix.
- You may fill in the Note field for your notes or remarks.
- After filling in the details of the new duty status, tap the OK button to save the new duty status event. You can also select the Cancel button to cancel adding the said duty status.
- Driving and ON Duty ND will be having On Duty Time Until Break remarks in the button
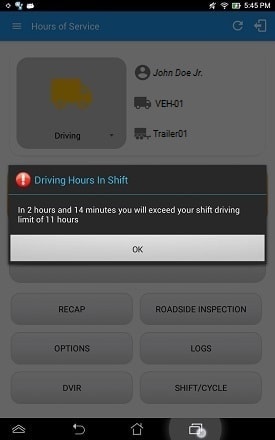
Note: When the HOS app is in the background and a violation occurs, the app launches itself along with a warning dialog for the driver.
4. Familiarizing The Hours of Service Default Dashboard Tiles
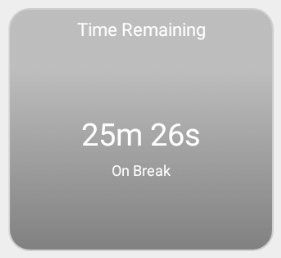
- Time Remaining Tile:
- When the Time Remaining Tile changes into a grey color it indicates that the driver is off duty, sleeper or waiting at well site; when the tile changes into a green color, it indicates that the driver’s status is driving or on duty; when the tile changes into a red color, it indicates that the driver has less than 1 hour left or has already ran out of time.


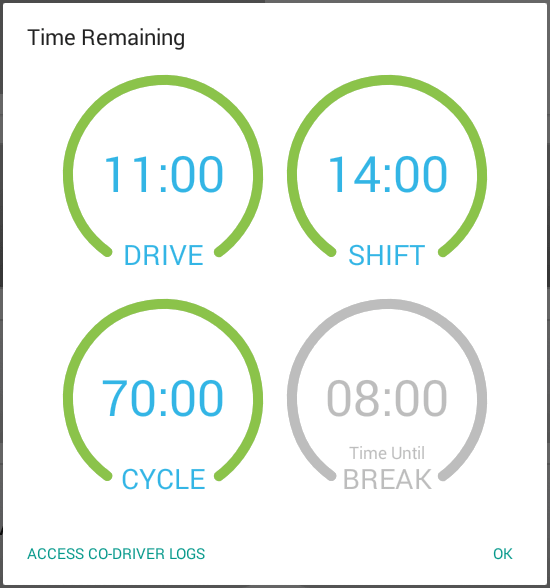
- Tap the button to view Time Remaining Clocks.
- If there is a logged in Co-Driver, it is possible for him/her to view the logs and access the application, but with very limited conditions. This can be done by tapping the
 button to display the co-driver login screen.

- When the Time Remaining Tile changes into a grey color it indicates that the driver is off duty, sleeper or waiting at well site; when the tile changes into a green color, it indicates that the driver’s status is driving or on duty; when the tile changes into a red color, it indicates that the driver has less than 1 hour left or has already ran out of time.
- Recap Tile:
 Tap the button to bring up the recap information for the specified duty day and corresponding cycle data as of the said specified day.
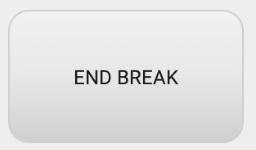
 - Start Break Tile:
 The Start Break tile will be disabled when the duty status is Off Duty, Sleeper or Waiting at Well Site.
 The Start Break tile will be enabled when the duty status is On Duty or Driving. Once you tap the Start Break tile, a dialog will then pop-up asking you to start the break.
Notes:- If the ‘Start Break’ button is pressed, then:
- It sets the status to OffDuty
- The ‘Start Break’ button turns to ‘End Break’
- The Time remaining button turns to On Break and the second line shows “time remaining 00:00”
- If the ‘End Break’ button is pressed, then:
- It sets the status to ‘On Duty’ (if the vehicle is not moving) or ‘Driving’ (if the vehicle is moving)
- If the ‘Start Break’ button is pressed, then:
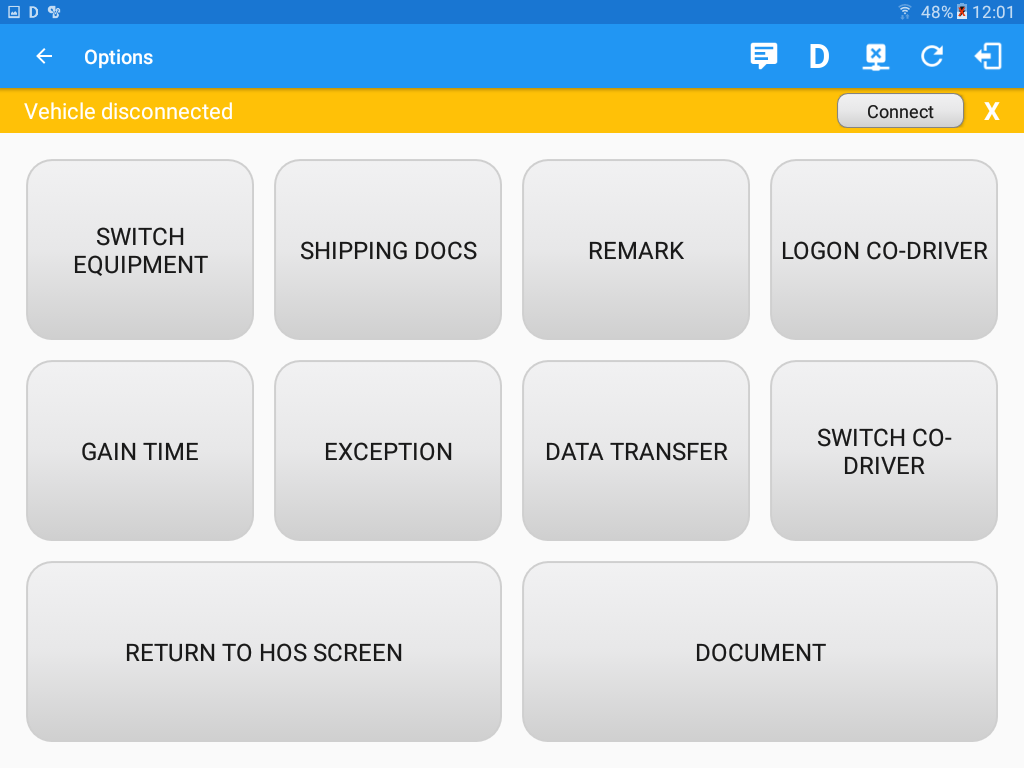
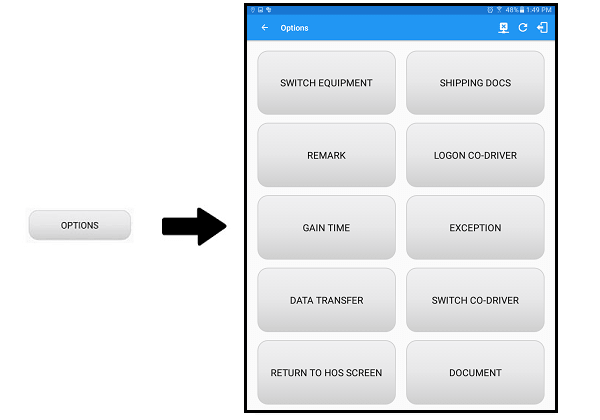
- Options Tile: This will navigate the user to the Options screen.
- Logs Tile:This will show the user to open the Driver Logs navigation drawer.

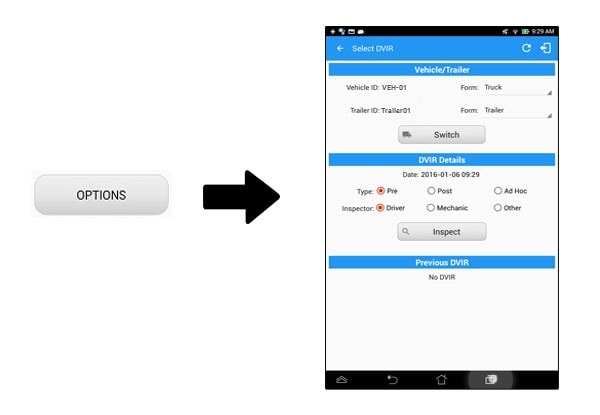
- DVIR Tile: This will navigate the user to the DVIR screen.
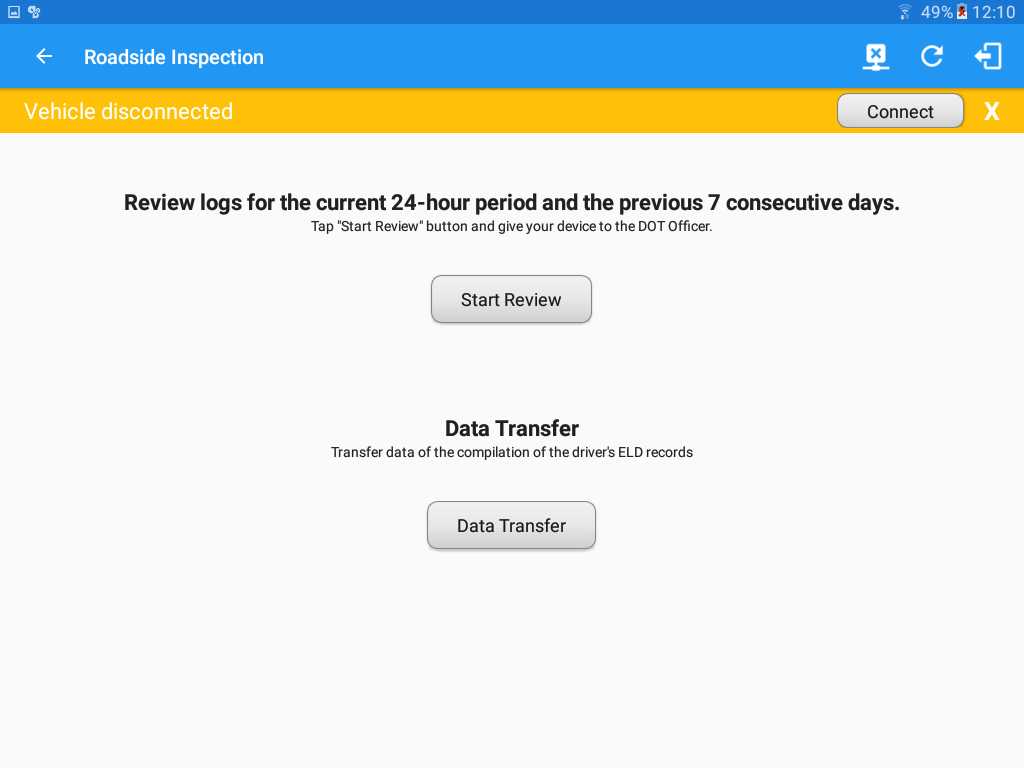
Note: Once a new driver has log on to the HOS app, the forms for the Vehicles/Trailers ID used by the prior driver shouldn’t retain. Form fields must be empty. - Roadside Inspection Tile: The Roadside Inspection feature provides the ability to view the driver daily logs for the past one (1) week. It includes information on the vehicle used, shipments and driving statuses. It also has the ability to send all the logs that have already been certified to an intended recipient.
- Reviewing Logs
-
- Tap the
 Start Review button.
- Tap the
-
- You will then be directed to the Driver’s Daily Log screen.
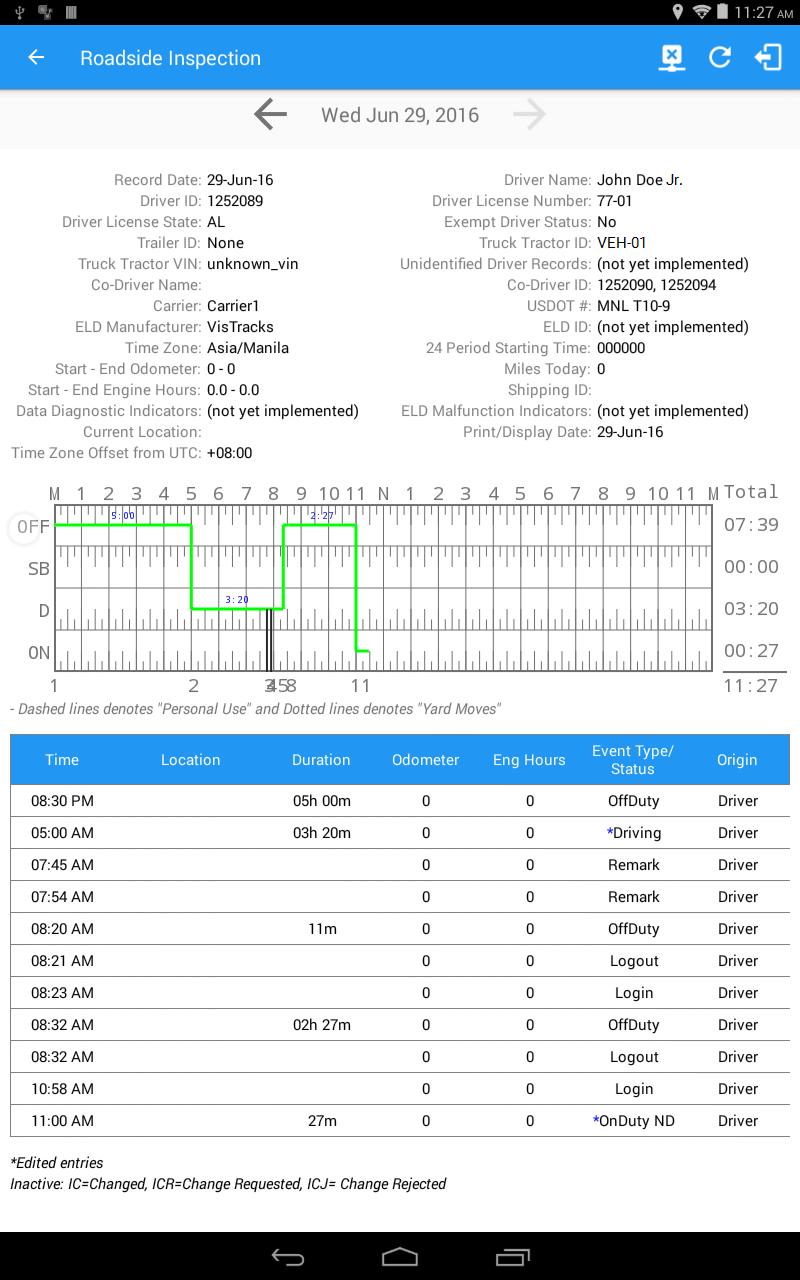
- You will then be directed to the Driver’s Daily Log screen.
-
- Tap the
 Previous button to go to the previous log.
- Tap the
- Tap the
 Next button to go to the next log.
The Violation circles will not appear on the output of the compliance office and that the red lines shown in the grid chart in the daily log screen will be displayed as a green line when reviewed in the daily logs for the roadside inspection.
A legend (*Inactive: IC=Changed, ICR=Change Requested, ICJ=Change Rejected) has been added on the PDF reports located below the events history table when the driver is on ELD mode. Events that have been edited out and the asterisk annotation is not shown when the driver is on AOBRD mode. -
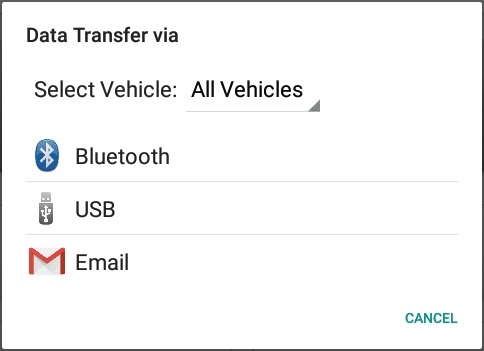
- Data Transfer
-
- Tap the
 Data Transfer button.
- Tap the
- This will show the dialog displaying the supported data transfer options. See the Data Transfer section for more details
Note: User must provide a password when exiting from the Roadside Inspection screen.
-
- Reviewing Logs
- Shift/Cycle Tile: This will show a dialog displaying the total work hours of driver’s current work shift and total working hours that the driver can legally accumulate over a certain cycle or a consecutive multi-day period

5. Warning Features
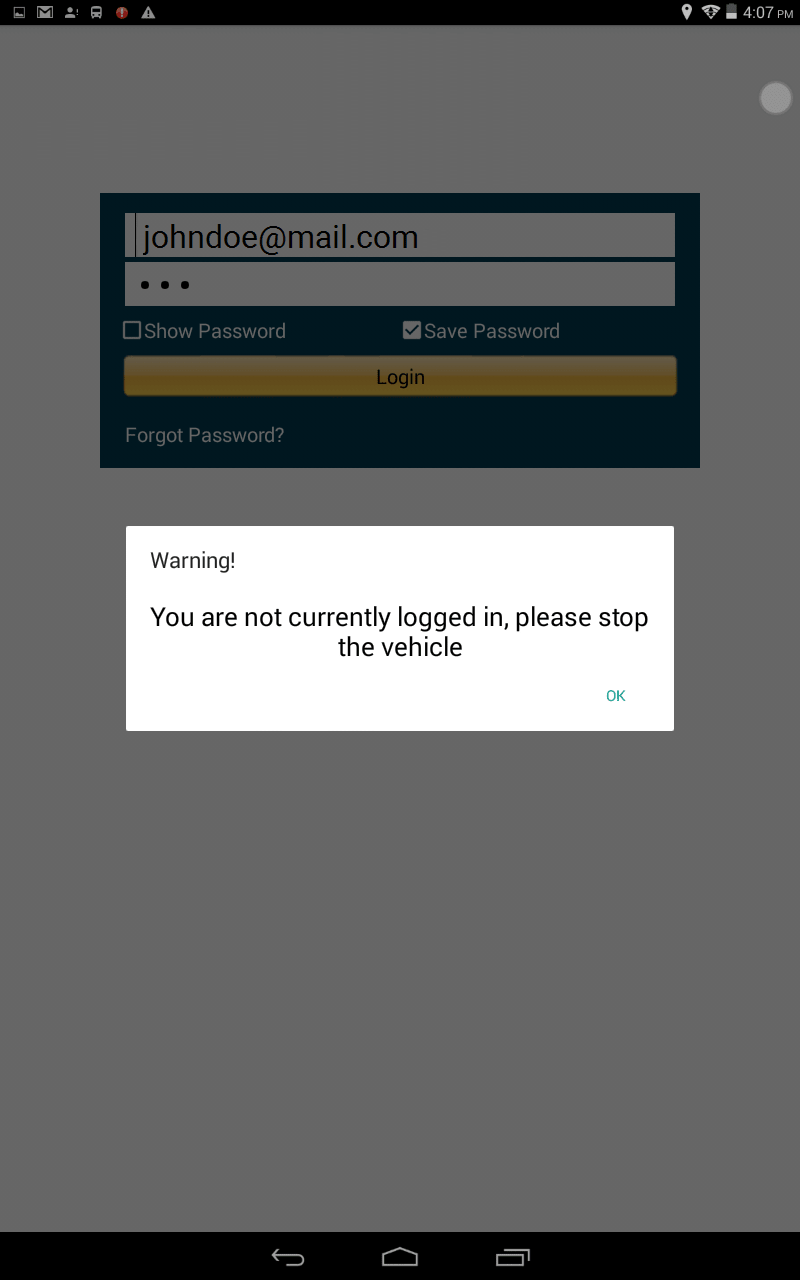
- If the driver logged out from the app and that he does not log onto the ELD, as soon as the vehicle is in motion, the ELD prompts a visual and audible warning reminding the driver to stop and login to the ELD.
- If the driver logged into the application without the Location Services turned on, a snackbar will display on the main dashboard and to other screens as well

- However, the snackbar will not display to the screens navigated through the Settings menu. The snackbar will no longer display when the Location Services if the device is turned on.
- If a driver logged into the application on a device that he/she has logged in before, the driver can login and logout successfully to the app even when internet connection is not available.
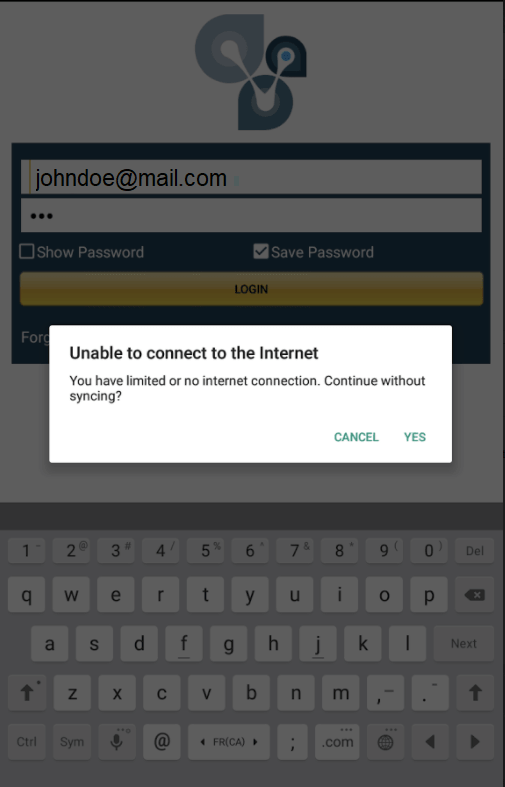
- Eventually when device is connected to network, logs will be automatically synced to the portal.