Back to Platform Overview
The Locations Tab allows you to see your the most current location of your devices. This page updates automatically and does not require any refreshing to see the newest incoming information.
Across the top of the page, you’ll find the following options:
Filter Devices – allows you adjust which units are displayed by checking or unchecking as needed. This does not remove units from billing or turn the devices off. Please contact Support if you need to remove units from your account.
Status – you can sort and filter your units based upon their current engine status
Search for Device/Driver – very useful for larger accounts, this allows you to search for a particular Device or Driver without having to scroll through the entire list
Find Nearest Vehicle – you can search a particular address or geofence to determine which of your vehicles is closest to the location (by mileage)
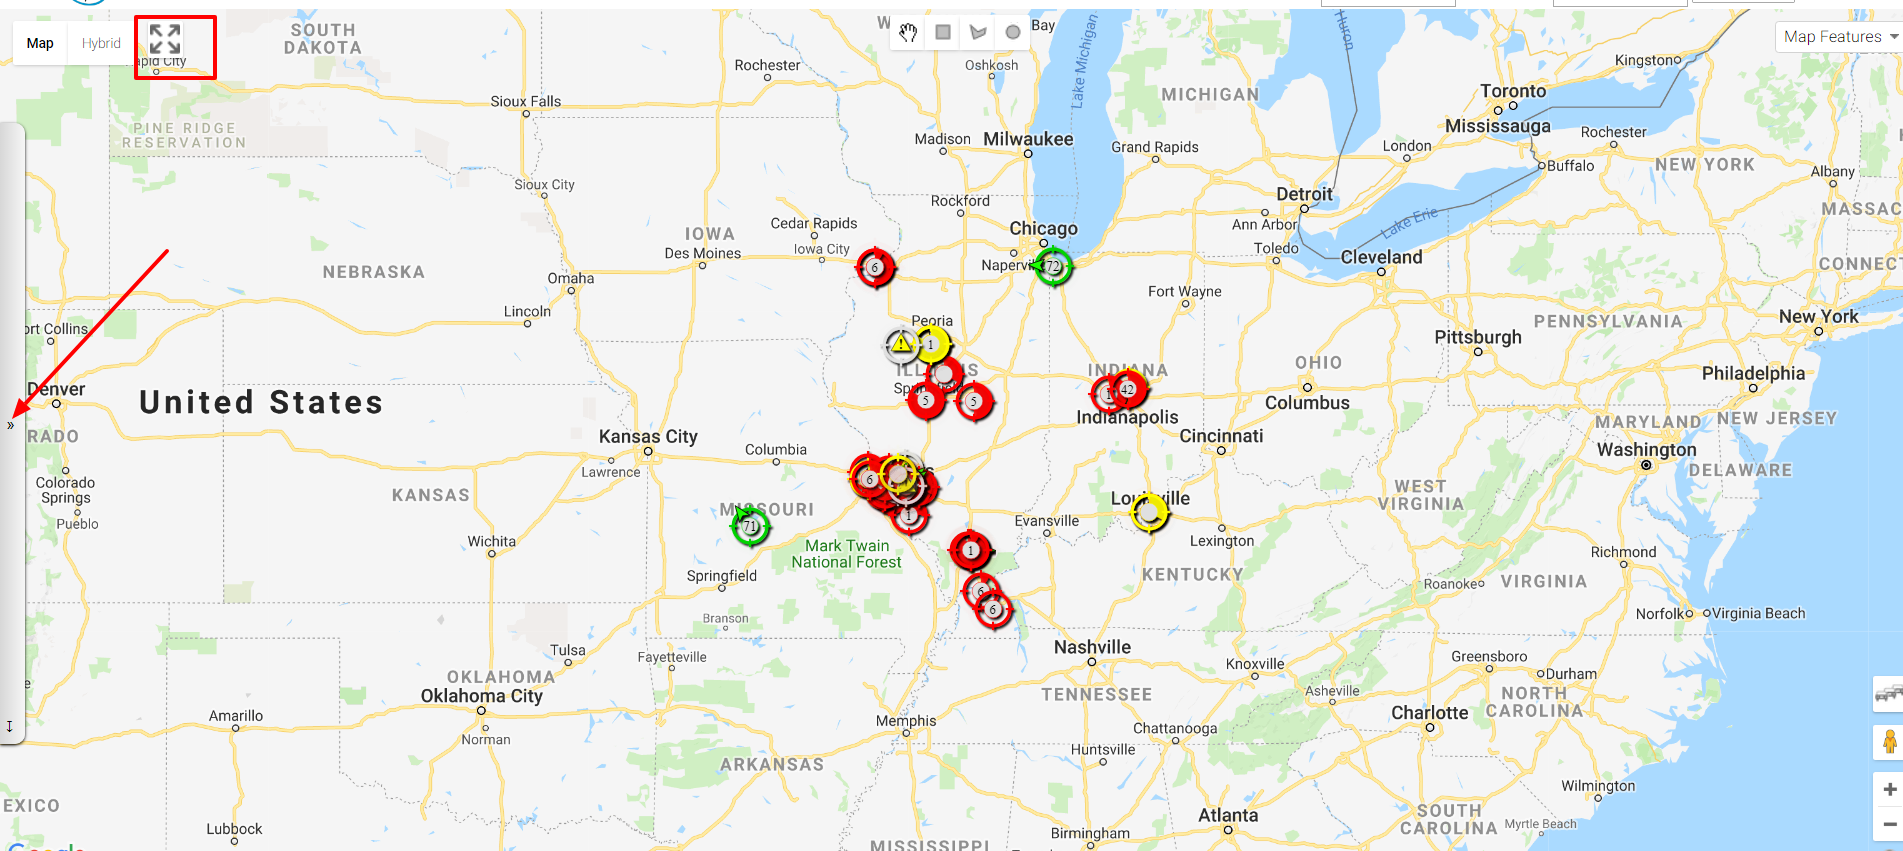
The left side of the page displays the written address and the right side displays the map representing those locations, with an icon showing the location of each device. The icons are color coded as follows:
Red – Stopped
Yellow – Idling
Green – Moving
Yellow Triangle – Offline
Red Circle – No Readings
Red Exclamation Point – Low Vehicle Battery
The devices come pre-activated so they will display in your account right away and prior to installation will show the yellow Offline triangle as they will not be receiving power. As soon as the devices are installed they will register a location and status.
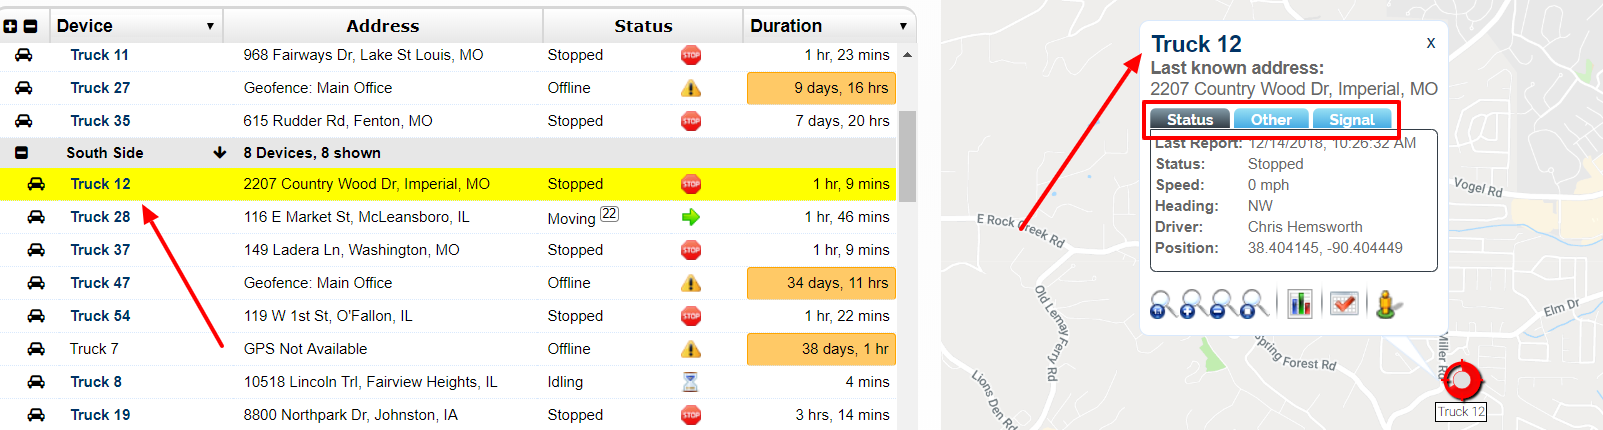
The Devices will be displayed in the list on the left hand side of the page by the Categories they’ve been assigned to. Within these categories you are able to sort A-Z or Z-A by device name
Arrow Up will display A-Z
![]()
Arrow Down will display Z-A
![]()
There are also several options on the map:
You are able to toggle between Map or Hybrid (satellite) view using the button in the up left-hand corner. Next to this, you’ll find a box with 4 arrows. Clicking in this box enlarge the map to Full Screen view, hiding the data column on the left. Clicking this again will return the map to its default size.
In the upper right-hand corner you’ll find a drop-down marked Map Features:

Geofences – makes the boundary lines for existing Geofences visible on the map
Landmarks – makes the Landmark icons for your Geofences visible
Cluster – used when multiple vehicle icons in a near vicinity overlap. This cleans up the view, where one icon will represent multiple vehicles with a number in the middle to represent the total number of devices
Show Name – displays the device name, to tell which icon represents which vehicle
Show Driver – displays the name of the driver assigned to the device
Traffic – shows current traffic conditions for the major roads. Green is moving, orange is slowing and red indicates heavy traffic
Scroll wheel – allows you to use the wheel of your mouse to zoom in and out on the map
Lock – Prevents the map from automatically zooming in/out to keep all icons in view. You are still able to manually adjust your zoom with the scroll wheel
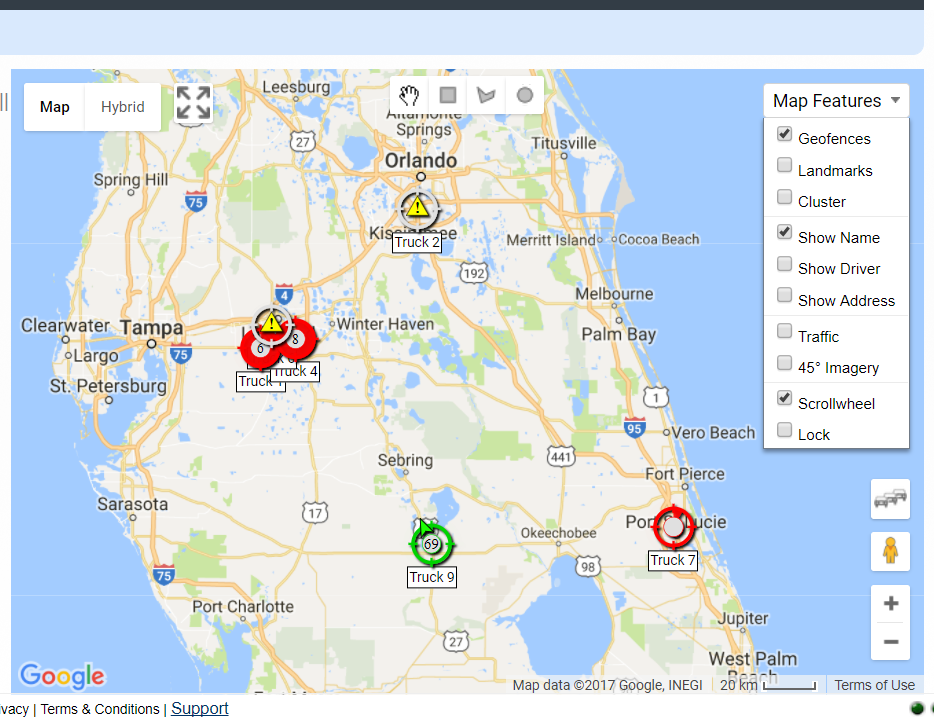
In the lower right-hand corner you’ll find 3 icons: Fit to fleet, Street view and Zoom In/Out.
The map size can be customized by using the 3 vertical lines you’ll see between the map and the address on the left . Just click and slide in the direction you’d like.
Icon Options
Left Clicking on the vehicle icon will produce the Info box, as well as automatically highlighting the vehicle on the list to the left. This info box will contain data such as device name, status, etc… There are three tabs to select from, which will show the data details.
Right Clicking on the vehicle icon produces the ability to see current and historic trail lines. This is ability to see from Locations the travel history for the vehicle.
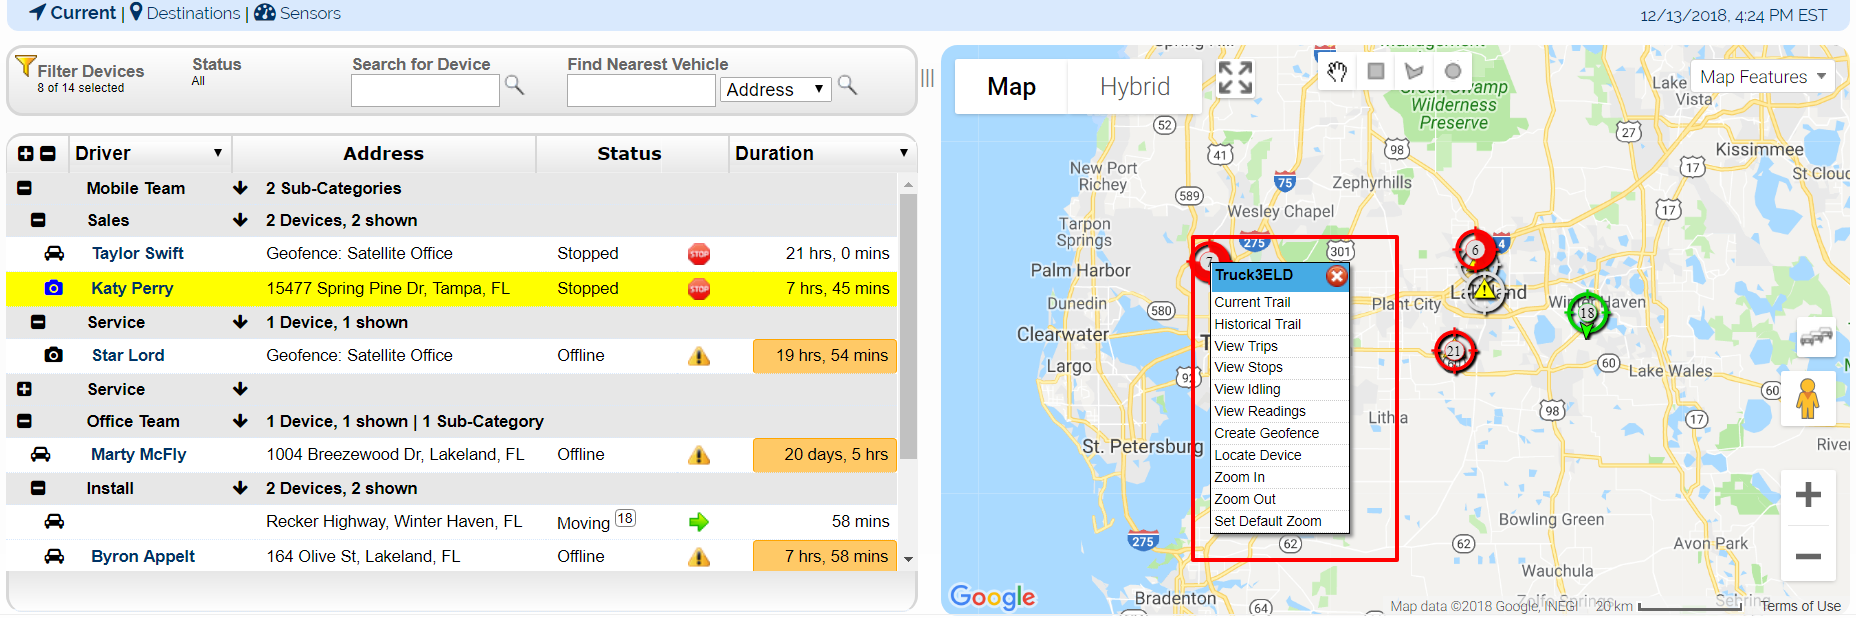
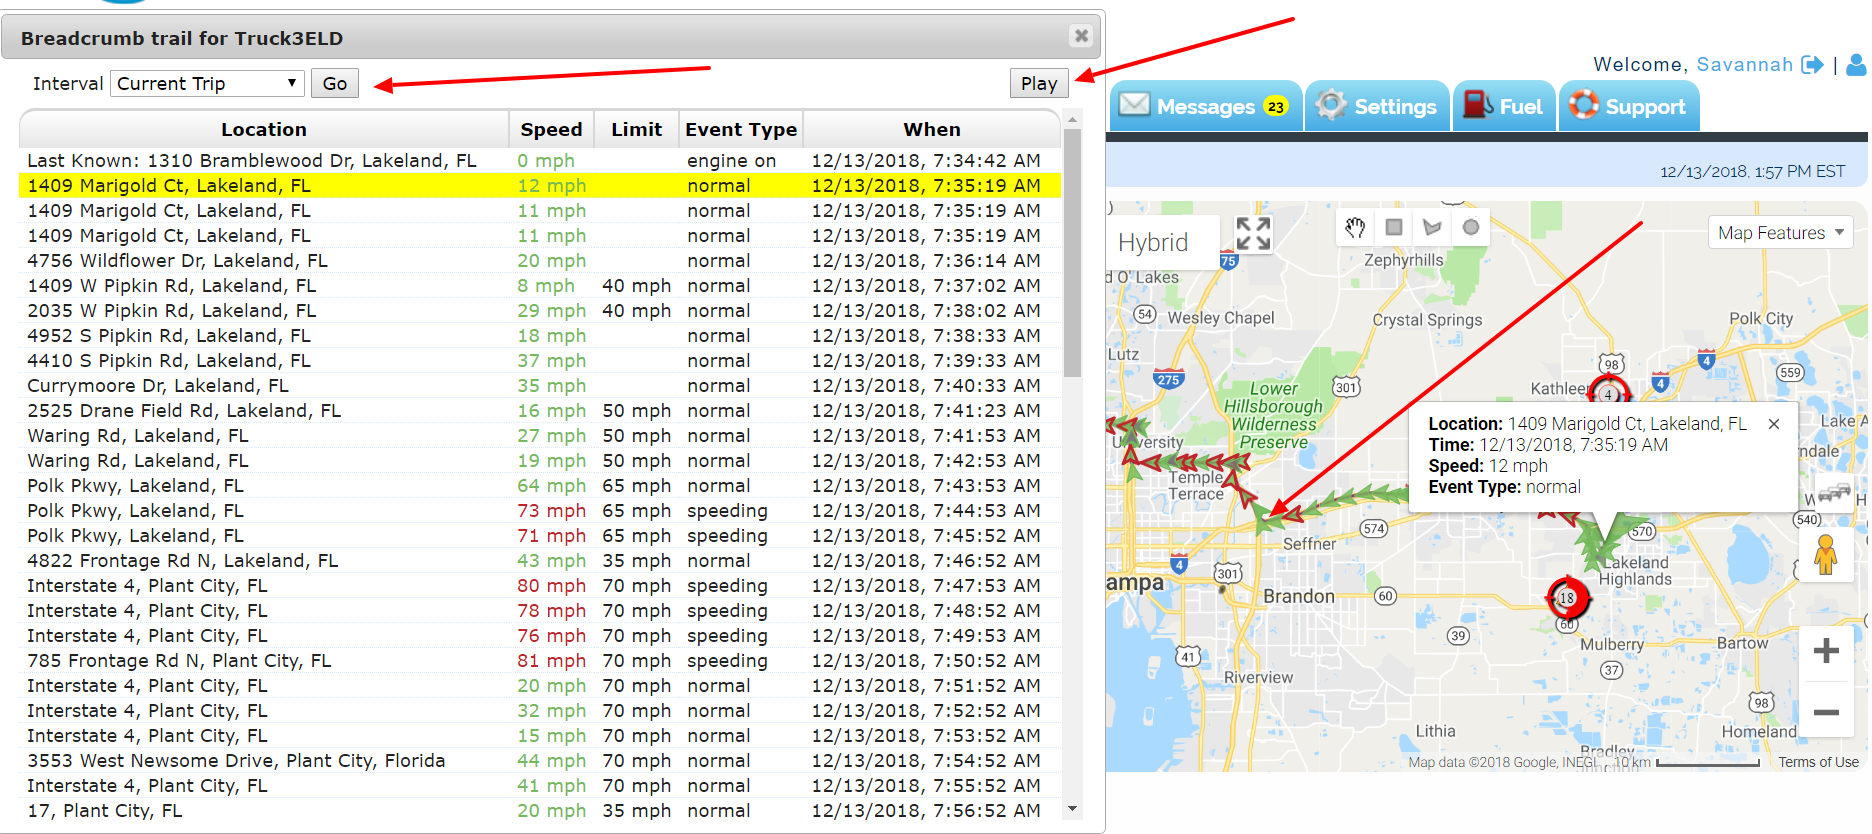
Current Trail will highlight the most recent route on the map. Historic Trail provides a shortcut to a Single Day Trips Report, which is where multiple trail lines can be viewed at once.
Full Screen Use
When the map is on Full Screen, you will still have use of the various features. In the upper left-hand corner, you’ll find a drop down to access the other tabs for the rest of the account. Down the left-hand side, you’ll find a pull out box with your device data (device, location, status, duration). Just click on the arrow to access.

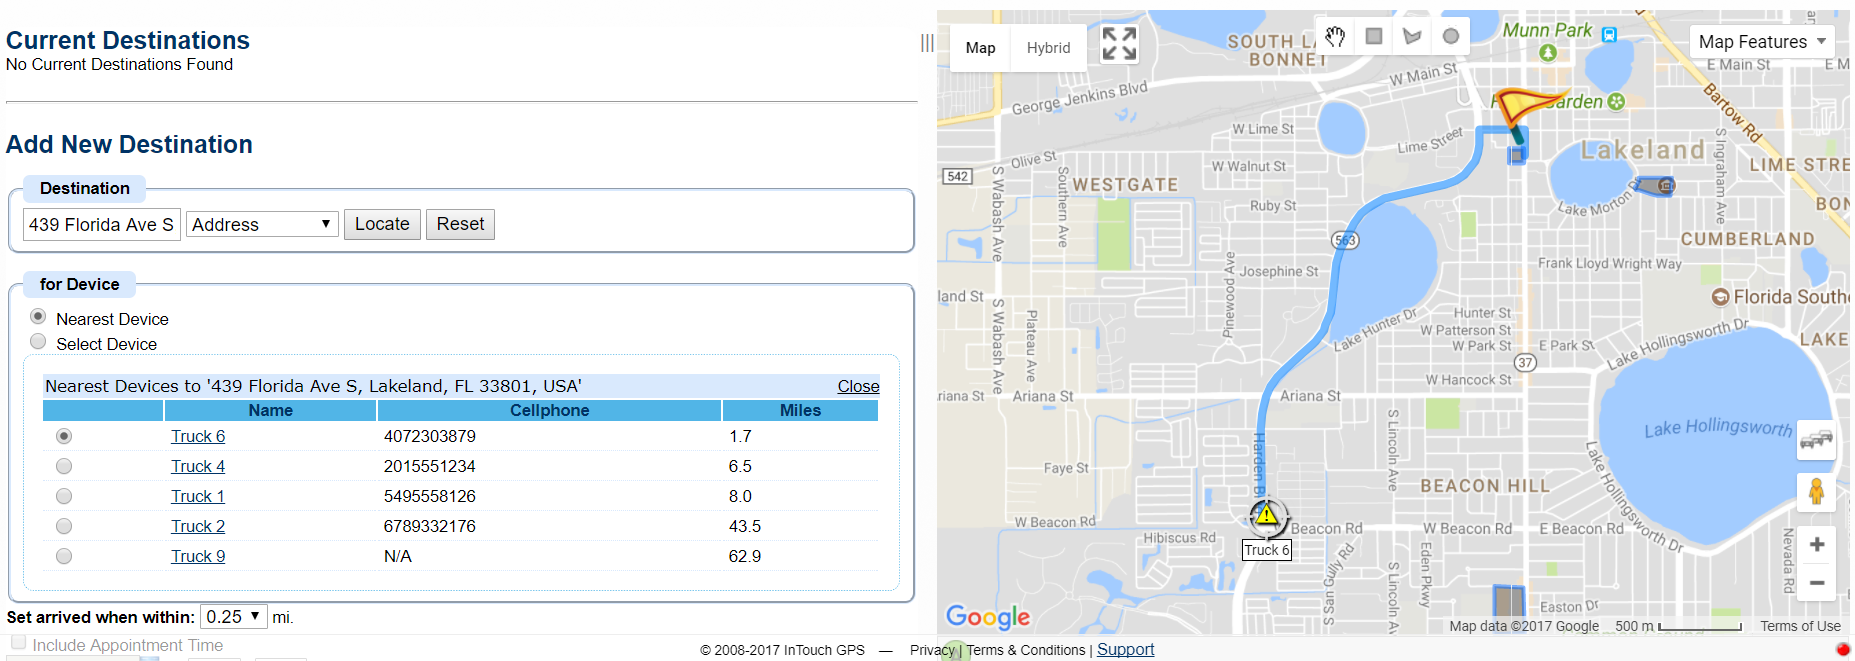
Destinations
The Destinations feature allows you to send last-minute job assignment locations to your drivers. This is not to set a schedule for the day but rather to deal with emergent issues as they come up. Destinations is found in the sub-menu in the Locations tab. Here you can enter the address and click the “Find Nearest” button to find the closest vehicle to that location. The system will pull up 5 of your closest vehicles and display the distance to the address entered (in miles). Here you can select which vehicle you would like to send the information. You can send the address, turn-by-turn directions, and a message regarding that location. Just select the check boxes with what information you want to send and click “Save Destination.” This information will then be sent via text or email dependent on how you set up the driver profile assigned to the selected device.
***To utilize this feature, you must have a Driver Profile created for each driver and assign it to the correct device. The profile must include an email address or mobile number for text messaging. For more information see the Drivers section.***

Diagnostics
This link allows Diagnostic enabled units (those plug into the OBD II port of the vehicle) to display the read-outs directly on the Locations Tab for you to view. Simply click on the Diagnostics link, then select the desired vehicle. Clicking on Current will take you back to the regular Locations Tab. For further information regarding Diagnostics, please go to the Diagnostics section of this User Guide.
Sensors
For units that utilize Vehicle Sensors, the link allows you to see those readings from the Locations tab. Clicking on this link will replace the drop down that shows Duration, etc… with one that shows the following:
Battery Voltage
Engine Coolant Temp
Engine Speed
Fuel Level
Fuel Remaining
OBD Indicators
Odometer
Throttle Position
Trip Fuel Consumed
Vehicle Speed
iButton Temperature Sensor
Clicking on Current will take you back to the regular Locations Tab. For further information regarding Sensors, please go to the Temperature Sensors section of this User Guide.