Back to ELD Driver App
Switch Equipment
The Switch Equipment feature allows a driver to easily ‘switch’ from one vehicle to another. It also assists in monitoring and documenting the vehicles being used as part of their driver logs.
The following are the different ways to perform a Switch Equipment action:
- Main Navigation Menu
- Swipe in from the left edge of the screen, or tap the Main Navigation Hamburger icon
 to show the main navigation menu.
- Touch the Switch Equipment option in the Main Navigation drawer after which the Switch Equipment dialog will then be displayed.
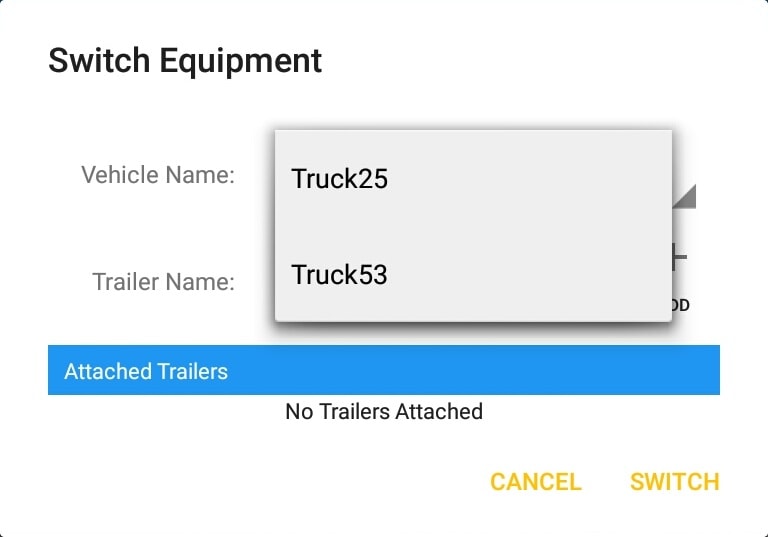
- Note: the list of equipment is displayed in an alphabetical order
- Swipe in from the left edge of the screen, or tap the Main Navigation Hamburger icon
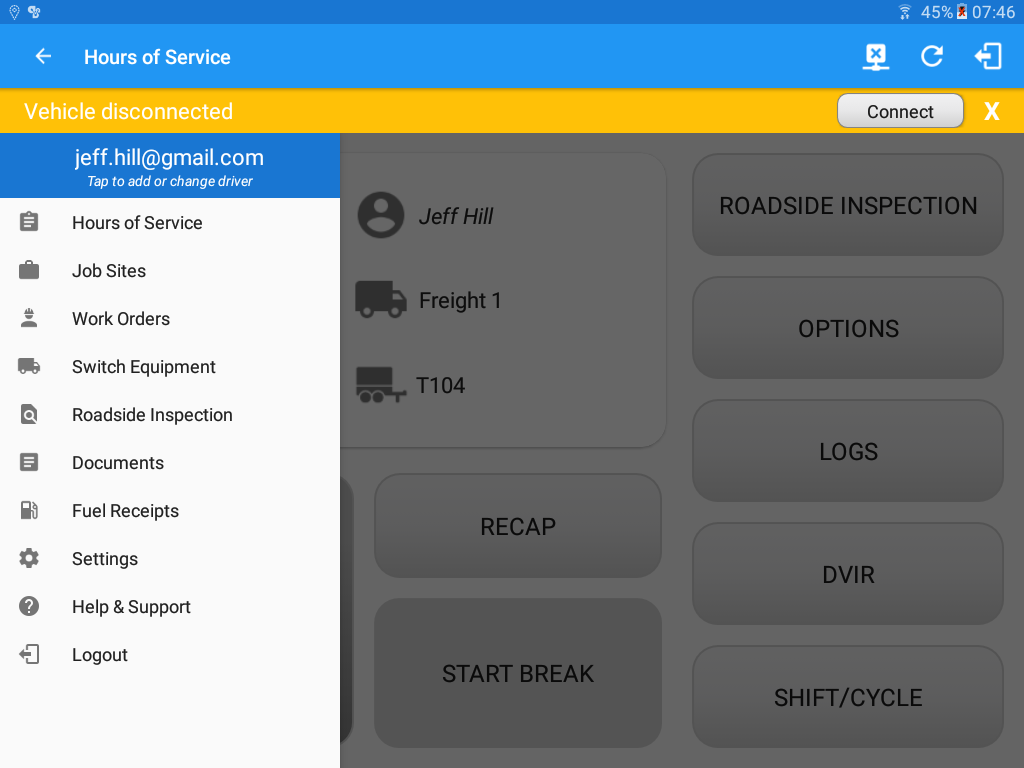
- Main Dashboard Vehicle/Trailer icons
- Touch the Vehicle/Trailer icons in the Main Dashboard screen.
- After which the Switch Equipment dialog will then be displayed.
- Touch the Vehicle/Trailer icons in the Main Dashboard screen.
- Switch Equipment Button (Options)
- Go to Hours of Service Main Screen.
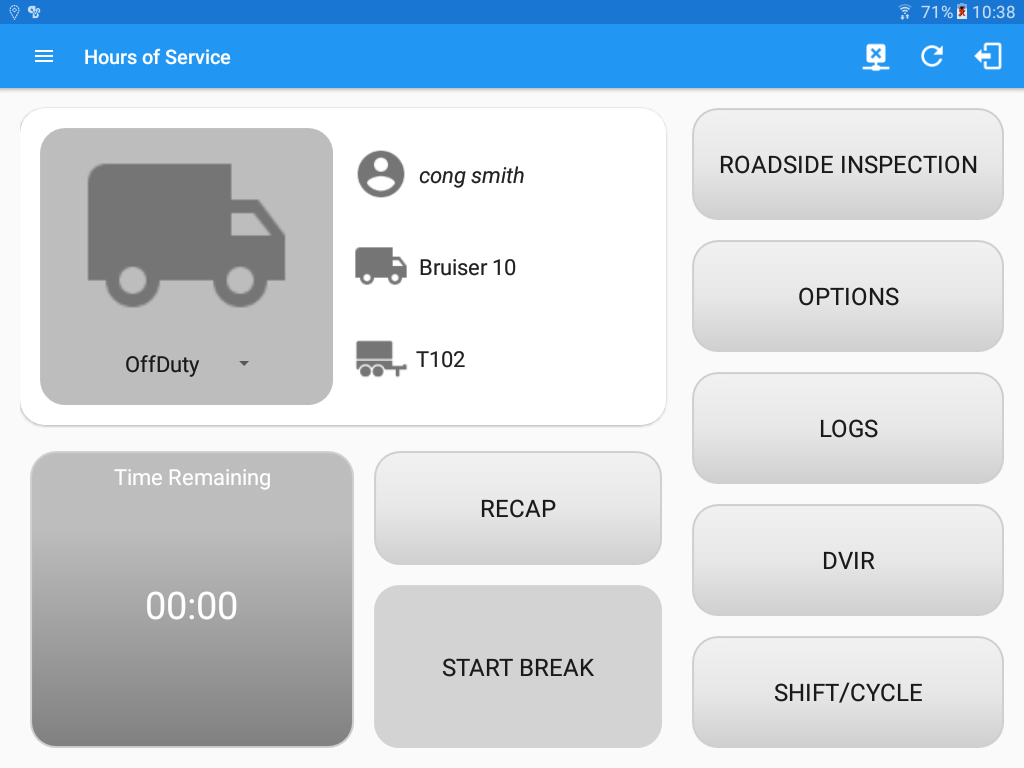
- Tap the Options button.

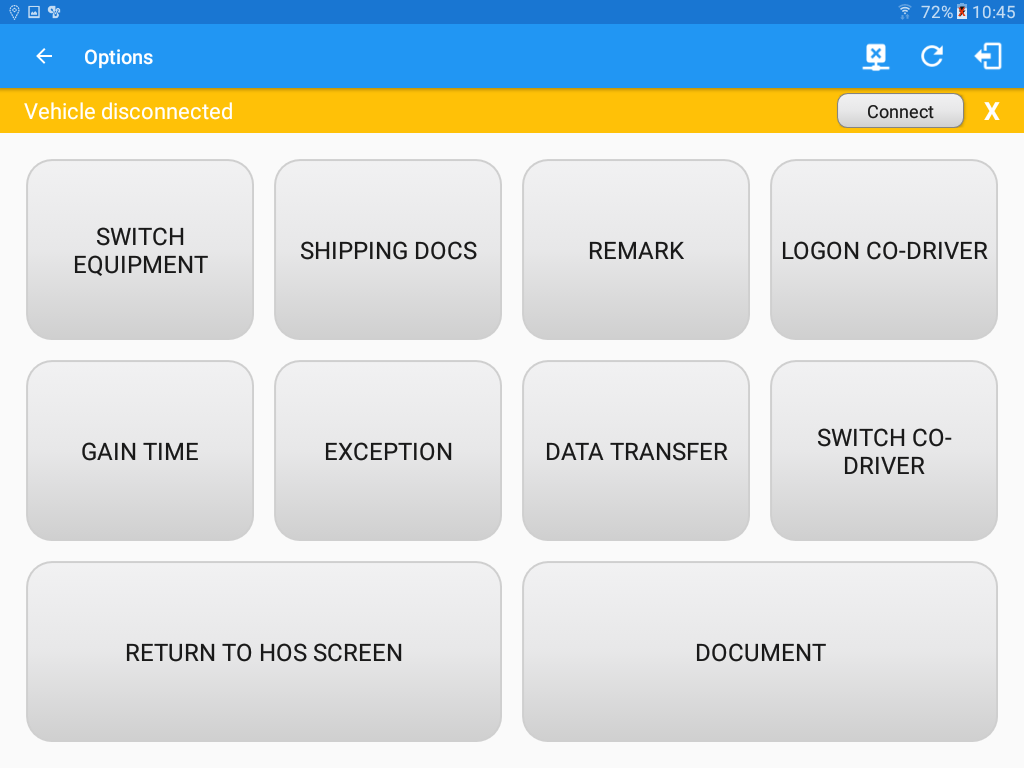
- Tap the Switch Equipment button.
- Go to Hours of Service Main Screen.
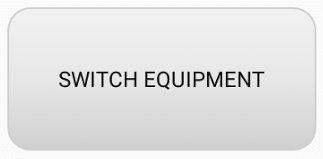
- DVIR Screen
- Swipe in from the right edge of the screen or tap the Logs button
 to show the Driver Logs Drawer.
 - Tap the Inspect button
 of a specific driver log.
- Tap the Switch Equipment button.

- Swipe in from the right edge of the screen or tap the Logs button
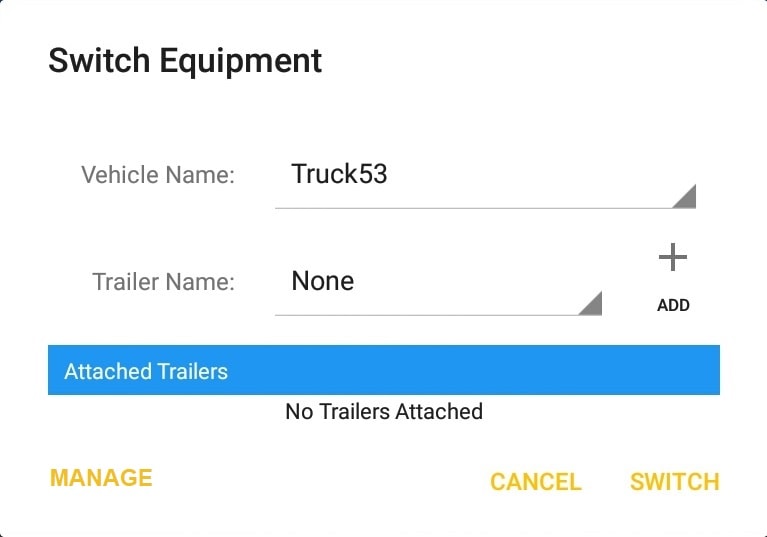
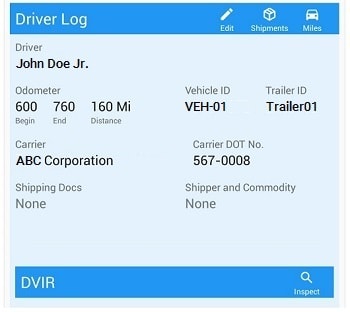
Switching Equipment
- Select Vehicle from Vehicle Name drop-down list.
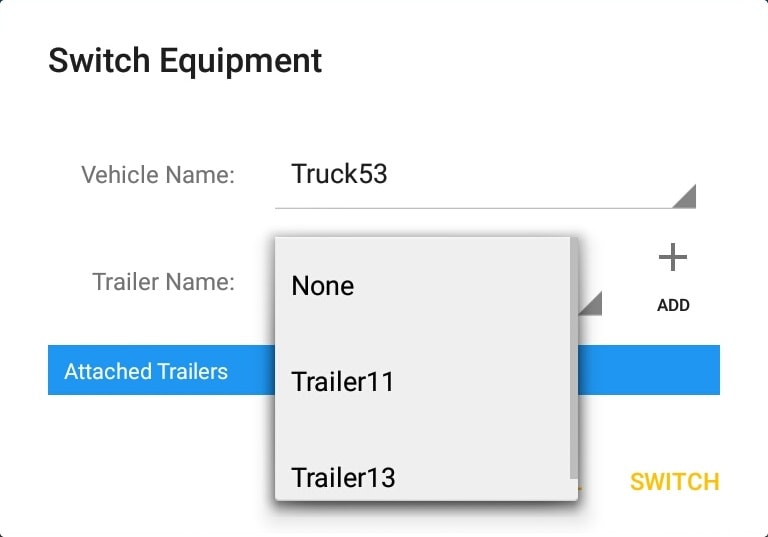
- Select trailer from Trailer Name drop-down list.
- Tap on the Add button to add the selected trailer to the list of Attached Trailers. Tap on the X button on the right side of the Trailer to remove it from the list.
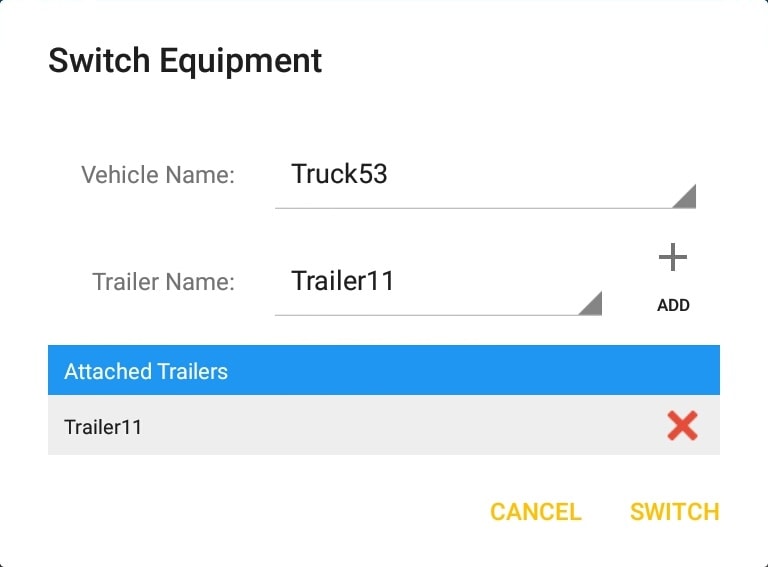
- Tap the Switch button to switch equipment successfully. To exit Switch Equipment form, tap the Cancel button.
Note: When the vehicle is in motion, neither the main driver or a logged in co-driver is allowed to switch trucks.
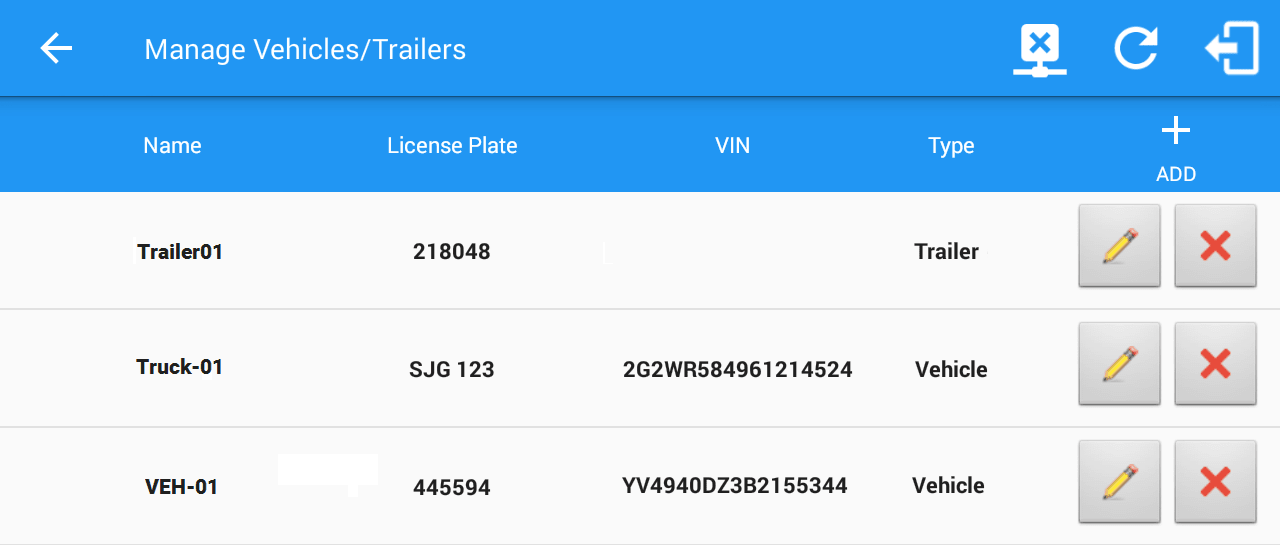
Managing Vehicles/Trailers
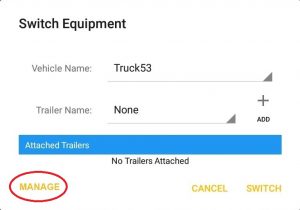
You can add, update and delete Vehicles/Trailers by tapping the ![]() Manage button which will then display the Manage Vehicles/Trailers screen.
Manage button which will then display the Manage Vehicles/Trailers screen.
Note:
- The ‘Manage‘ button is only available given a situation, that the driver is an asset admin and that the ‘Manage Equipment’ option (found in the Driver Management Page) is also enabled. Otherwise, the button will not be available on the Switch Equipment dialog.
- Adding Vehicle/Trailers
- Tap the
 Add button.

- Fill in the vehicle name in the Vehicle Name field.
- Fill in the VIN in the VIN field.
- Fill in the License Number in the License Plate field and its state in the License Plate State
- Select vehicle type in the Vehicle Type drop-down list.
- Then, tap the Add button to successfully add the vehicle/trailer. You can also cancel adding the vehicle/trailer by tapping the Cancel button
Note:- When creating/modifying an equipment with a selected type of “Trailer”, the VIN field is disabled and enabled if the equipment type selected is “Vehicle”
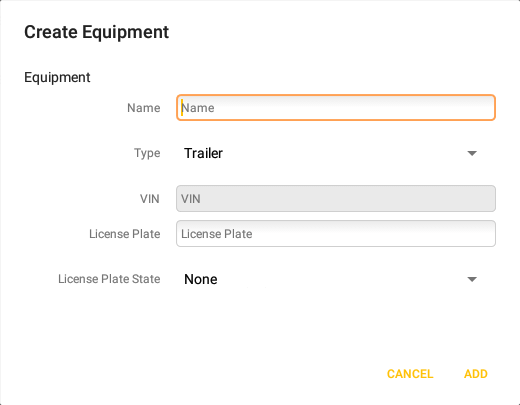
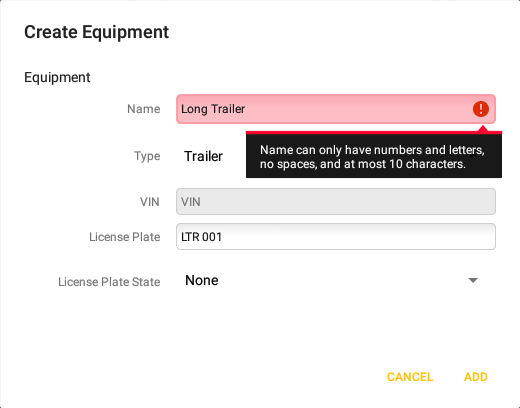
- When creating/modifying a Trailer, the name must only contain alphanumeric characters, must not have spaces nor exceed 10 characters.
- When creating/modifying an equipment with a selected type of “Vehicle”, and the Connection Type is ”Digi WVA”, then the admin password field is required.
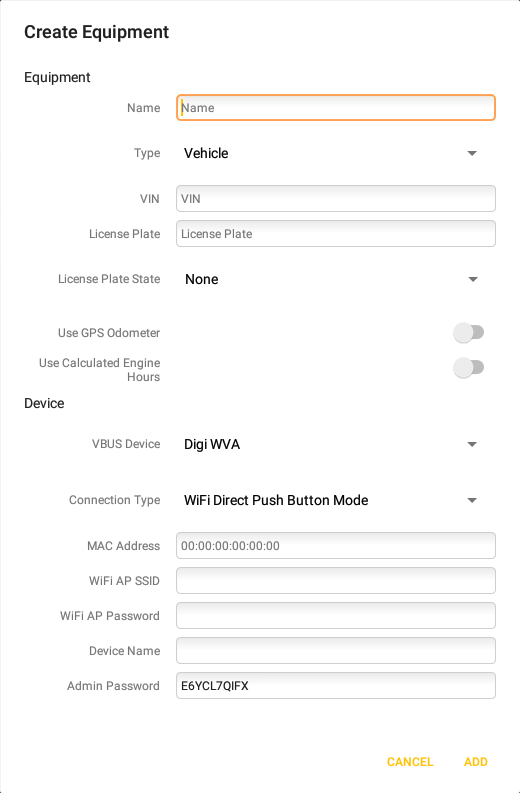
- However, if no device was selected during the creation of the equipment, the default selected device option is set to “None” and all the other fields on the ELD configuration section will be hidden.

- When a vehicle does not provide engine hours and odometer values, switch on the Use GPS Odometer and Use Calculated Engine Hours
- When establishing a connection to the VBUS device, the Vehicle VIN is one of the required data elements that needs to be present in all logs and DVIRs. Currently the app initially uses the VIN if it is present in the data set received from the device. However, If the app cannot acquire the VIN from the VBUS device then it uses the one present in the Equipment which will be auto converted to capital letters when saved.
- When creating/modifying an equipment with a selected type of “Trailer”, the VIN field is disabled and enabled if the equipment type selected is “Vehicle”
- Tap the
- Updating Vehicles/Trailers
- Tap the
 Edit button to edit Vehicle/Trailer.
- Update the appropriate fields in the Edit Vehicle/Trailer form.
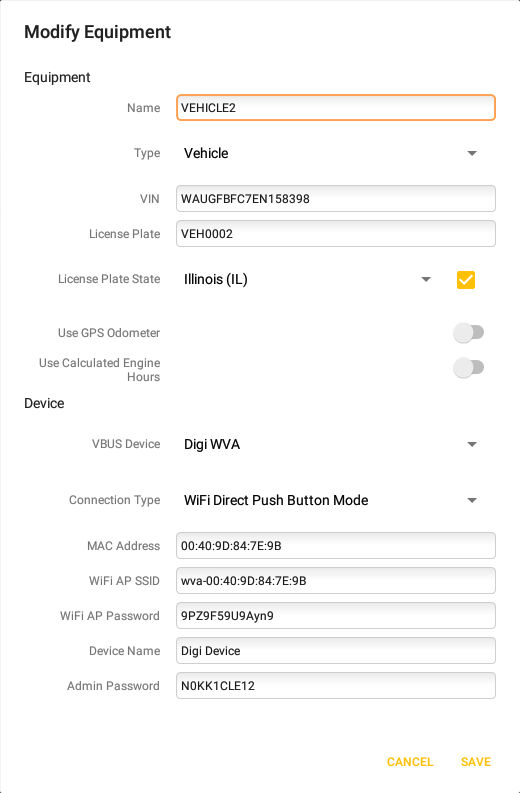
- To save the changes you made, tap the Save button. You can also cancel modifying the Vehicle/Trailer by tapping the Cancel button.
- Tap the
- Deleting Vehicles/Trailers
Tip: The current selected Vehicle/Trailer can’t be deleted- Tap the
 Delete button.
- To successfully remove the vehicle/trailer, tap the Delete button. You can also tap the Cancel button to cancel deleting the vehicle/trailer.
- Tap the
- Searching Vehicles/TrailersOn the Switch Truck dialog the driver is allowed to filter the vehicle and trailer list through text entry, ex: typing in ‘Trailer 8’ and seeing a list of the trailers that begin with the number 8. This feature is only available for customer who have hundreds/thousands of trailersNote: Text entry availability starts if the total number of trailers/vehicles reached 250 or more.
- Type in the vehicle/trailer name on the vehicle/trailer field


- Type in the vehicle/trailer name on the vehicle/trailer field