Back to ELD Driver App
Driver Options
The Driver Options menu allows access to various hours of service tasks including the following: management of vehicle/trailer information, adding of documents and remarks, reviewing of logs, and displaying of how much driving time you will gain after off duty.
Go to the Hours of Services Main Screen.
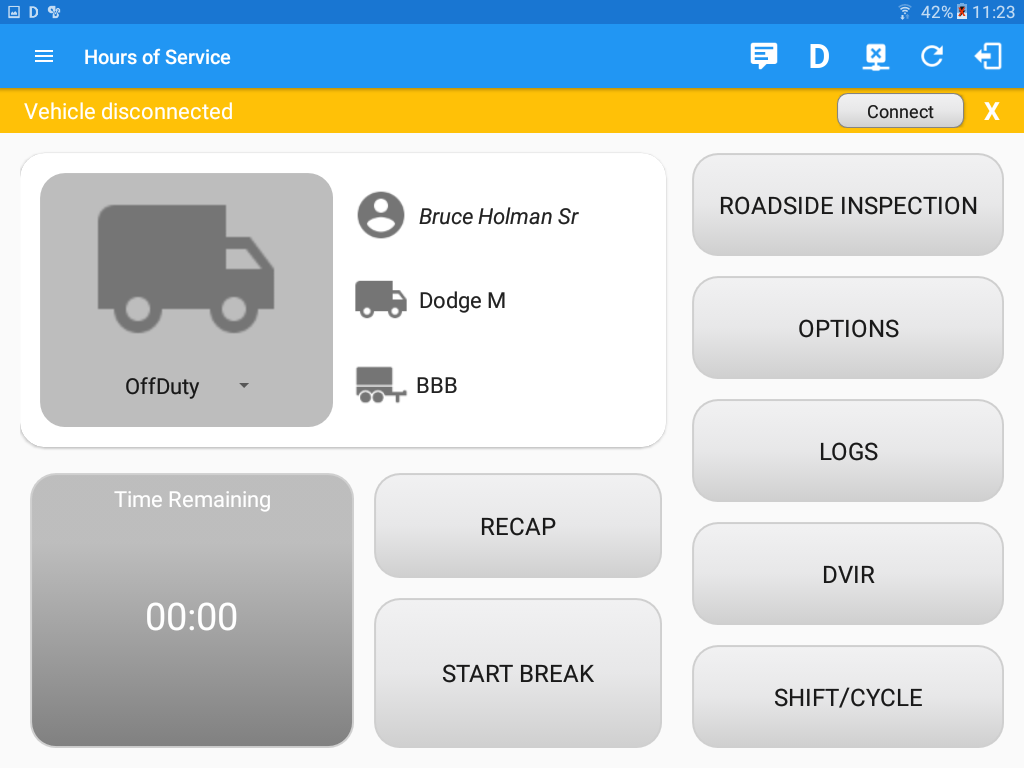
Tap on the Options button  after which the Options screen will be displayed.
- ‘Vehicle/Trailer’ button: This functions in the same manner as the ‘Switch Truck’ feature.
- The Switch Truck feature allows a driver to easily ‘switch’ from one vehicle to another. It also assists in monitoring and documenting the vehicles being used as part of their driver logs. (See the Switch Truck Help Page for reference.)
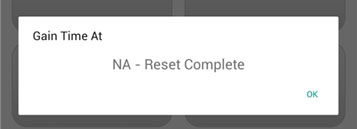
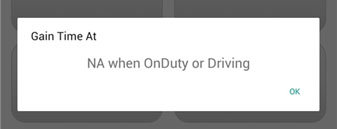
- ‘Gain Time’ button: Displays how much driving time you will gain after going Off Duty.
The following are the different pop up message dialog for the Gain Time At action:- Off Duty (Initial Status)
(Note: The values change as the status changes.) - On Duty or Driving
- Sleeper/Off Duty
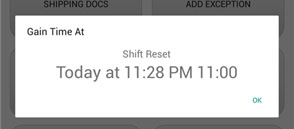
- Off Duty (Initial Status)
- ‘Shipping Docs’ button: This enables you to provide the transport document (manifest) that serves as the detailed summary of all the bills of lading issued by a particular carrier for a particular travel of a particular vehicle. The information of the shipper (the person or company that sends or transports the products) and raw materials or products sold or bought are also provided.
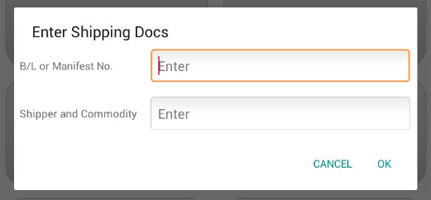
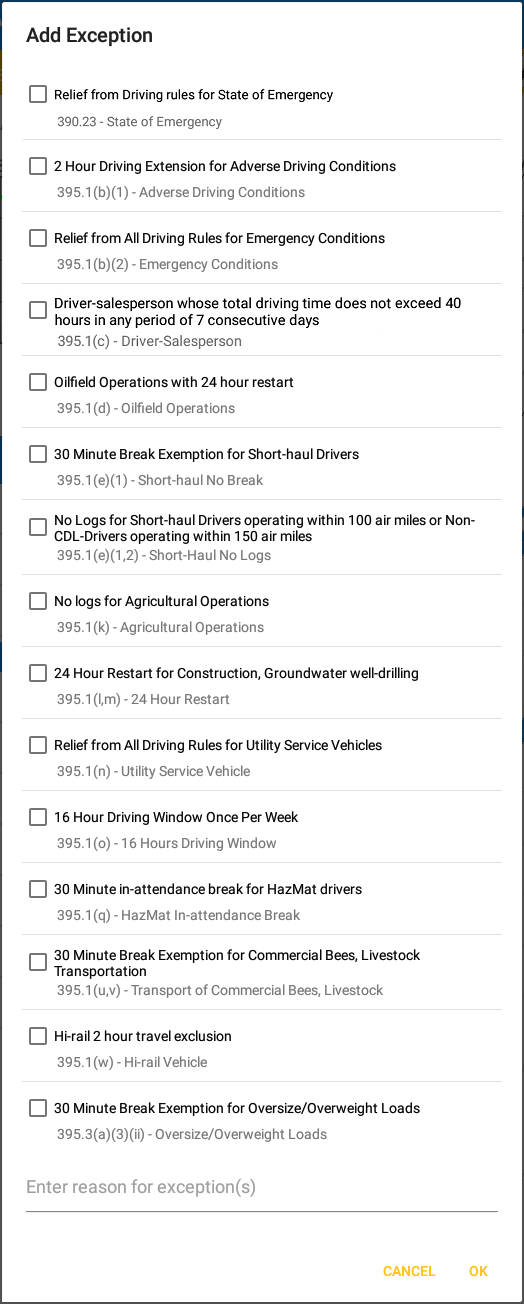
(Note: Entered data will be retained within the fields after clicking ‘Ok’ button.) - ‘Exception’ button: The options that will appear here will allow the driver to enable various exceptions from the HOS rules for as long as certain conditions are met as stipulated in the Hours of Service section of the Code of Federal Regulation (49 CFR Part 395.1 – Hours of Service of Drivers – Scope of rules in this part) and other pertinent FMCSA regulations.Tap on the OK button to apply your exception/s. You can also select the Cancel button to disregard the changes you made.Available US Exception Options:
-
- Relief from Driving rules for State of Emergency – 390.23
- 2 Hour Driving Extension for Adverse Driving Conditions – 395.1(b)(1)
- Relief from all driving rules for Emergency Conditions – 395.1(b)(2)
- Driver-salesperson whose total driving time does not exceed 40 hours in any period of 7 consecutive days
- Oilfield Operations with 24 hour restart – 395.1(d)
- 30 Minute Break Exemption for Short-Haul Drivers – 395.1(e)(1,2)
- No Logs for Short Haul Drivers operating within 100 air miles and Non-CDL-Drivers operating within 150 air miles – 395.1(e)(1,2)
- No logs for Agricultural Operations – 395.1(k)
- 24 Hour Restart for Construction, Groundwater well-drilling – 395.1(l)(m)
- Relief from All Driving Rules for Utility Service Vehicles – 395.1(n)
- 16 Hour Driving Window Once Per Week – 395.1(o)
- 30 Minute in-attendance break for HazMat drivers – 395.1(q)
- Include Two 1am to 5am Rest Periods for 34-hour Restart – currently suspended by FMCSA
- Use 168 Hour Rule for 34-hour Restart – currently suspended by FMCSA
- 30 Minute Break Exemption for Commercial Bees, Livestock Transportation – 395.1(u,v)
- Hi-rail 2 hour travel exclusion – 395.1(w)
- 30 Minute Break Exemption for Oversize/Overweight Loads – 395.3(a)(3)(ii)
 Note: ‘16 Hour Driving Window’ exception can only be used for the last 7 days or once in every 70hr cycle, if the driver attempted to enable the exception an error dialog will display stating the following:
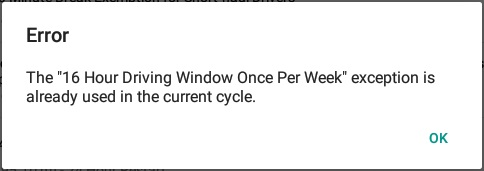
However, it is possible for the driver to add another ‘16 Hour Driving Window’ exception when a cycle reset has occurred. Nevertheless the driver will need to wait for the current cycle to end to be able to enable the exception again.
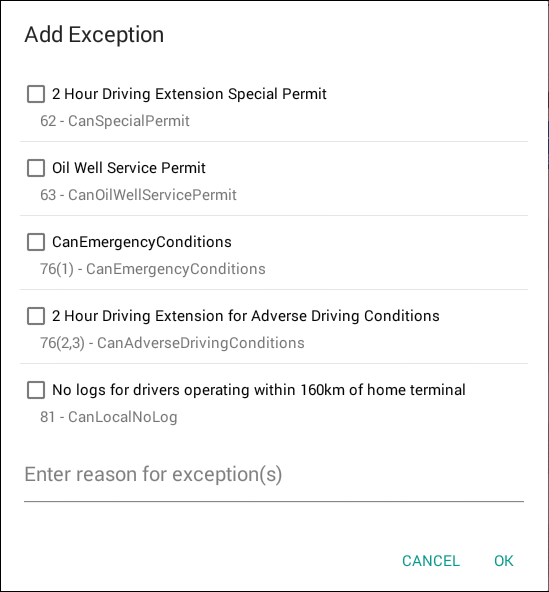
Available Canada Exception Options:
-
- 2 Hour Driving Extension Special Permit – Section 62
- Oil Well Service Permit – Section 63
- CanEmergency Conditions – Section 76(1)
- 2 Hour Driving Extension for Adverse Driving Conditions – Section 76(2,3)
- No Logs for drivers operating within 160km of home terminal – Section 81
Available Alberta Exception Options:
-
- CanEmergency Conditions – Section 76(1)
- 2 Hour Driving Extension for Adverse Driving Conditions – Section 76(2,3)
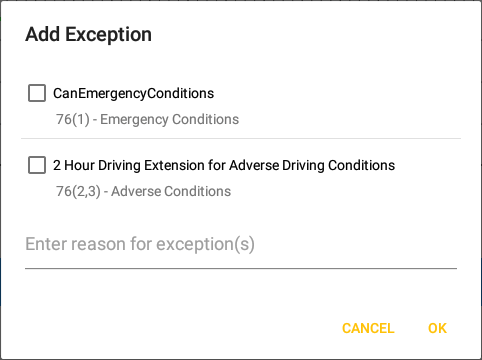
Note:Exceptions differ by Region. -
- ‘Remark’ button: This is where you can add a particular remarks or comment in a particular location.
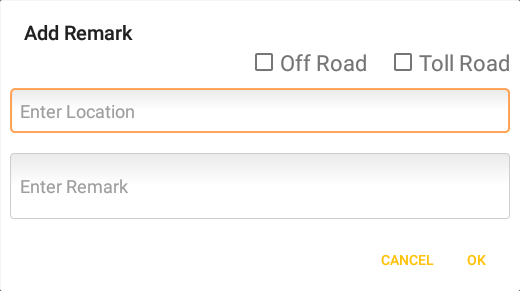
Off Road and Toll Road- You may also enable the Off Road and Toll Road options. These options are used for the IFTA calculations.
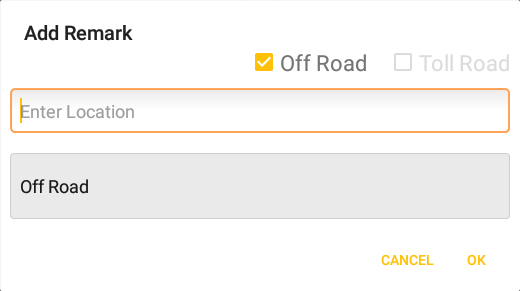
- Check the options to create a remark with a Note: Off Road and On Toll Road, respectively. To indicate that the driver has entered a normal road again, uncheck the Off Road or Toll Road option. This will create a remark with a Note: On Road and End Toll Road, respectively.
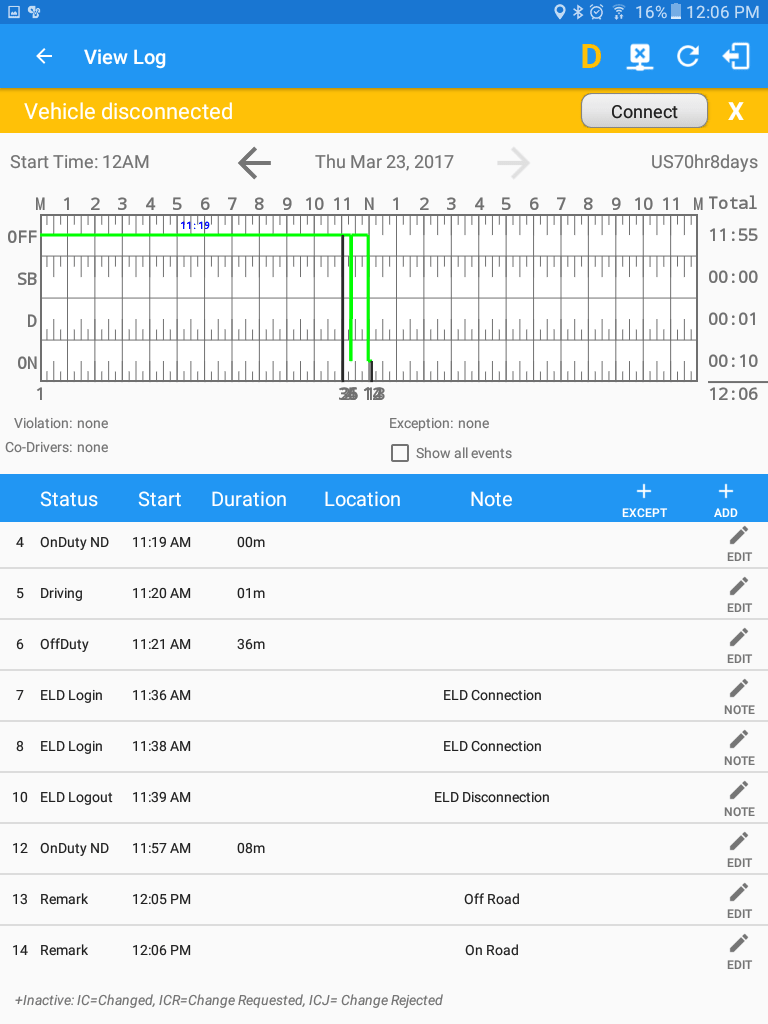
(Note:The location field will populate automatically if your GPS is turned on and a location is detected.)

After clicking ‘Ok’ button, remarks added are seen in the Driver’s Log.
- You may also enable the Off Road and Toll Road options. These options are used for the IFTA calculations.
- ‘Data Transfer’ button: This is where you can display the dialog with the supported data transfer options.
- Tap the
 Data Transfer button.
 - The Data Transfer dialog with then be shown. See the Data Transfer section for more details.
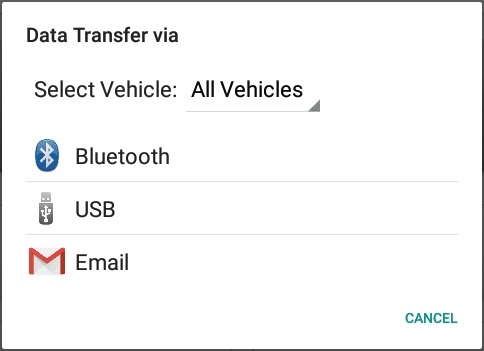
- Tap the
- ‘Logon Co-Driver’ button: This will allow another driver to log onto the app. Tap Logon Co-Driver button, after which the login activity will then be displayed.
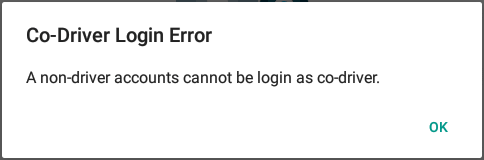
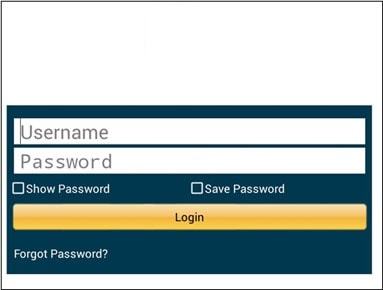 Note: Only authenticated users with a driver role are allowed to log-in to the application.
- ‘Switch Co-Driver’ button:This will allow the driver(s) to easily switch driving when on duty.
Tap Switch Co-Driver button , after which the Select Driver dialog will then be displayed.
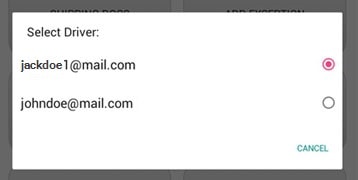
After selecting a driver it will then ask for the password before displaying the Hours of Service Main Screen of the current driver.
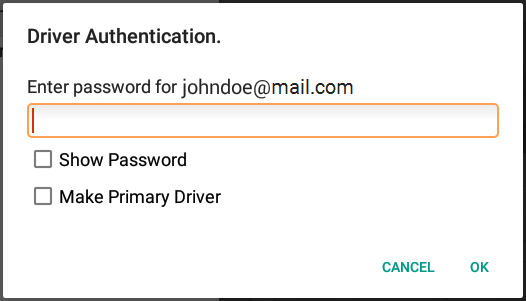
Note: By checking the Make Primary Driver checkbox, you can set the switching driver to be the primary driver. - ‘Return to HOS Screen’ button: This allows you to go back to the Main Screen.
Tap button to be able to navigate to the Main Screen.
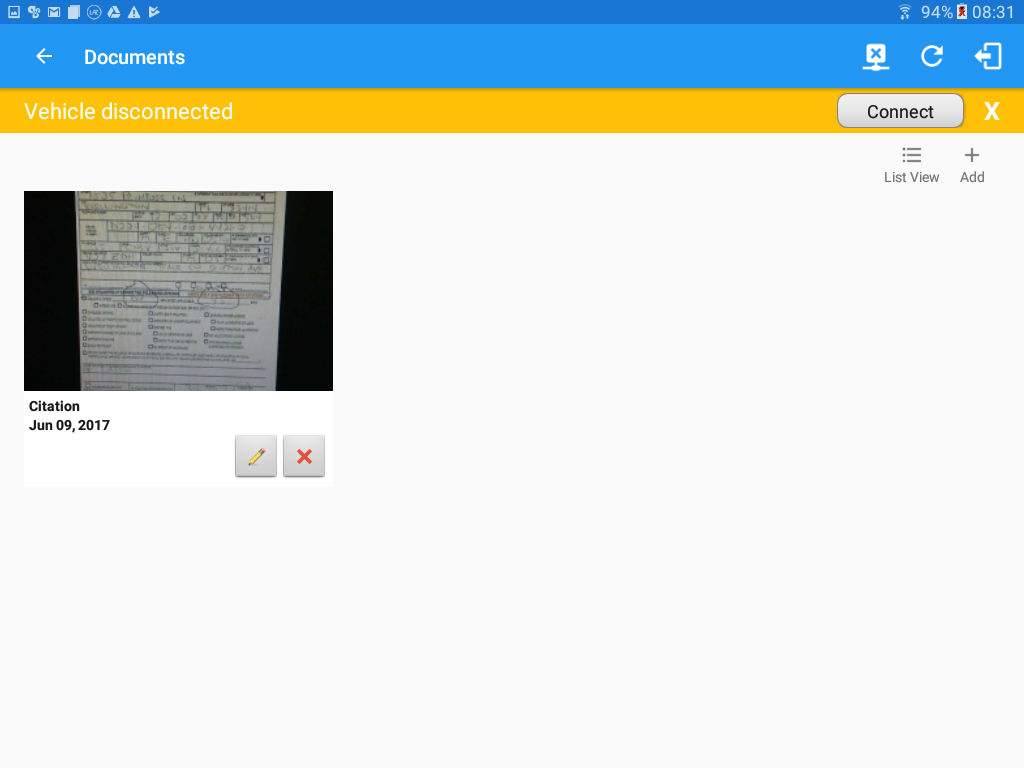
 - ‘Document’ button: The Document’s feature provides an easy way to capture and view documents related to hours of service activities. This includes documentation such as bill of lading, fuel receipts, accident photo, etc.
Tap the Document button after which the Documents screen will then be displayed.